NEW
SCHEME OF WORK:
WEEK TOPIC
1. Revision of first term work
2. Geometric Construction (b. Angles): definition and illustration of angles- right, acute, obtuse, complementary, supplementary, reflex, etc. (demonstrate how to measure angles.
3. Bisection and Construction of angles: 900, 600, 450, 22.50, 150, 1200, etc. (demonstrate how to bisect and construct angles)
4. Circles: (a) definitions and identification of circles, diameters, radius, chord, sector, quadrant and circumference, etc. (b) the use of set squares, tee square and compasses to divide a circle into 4, 8, 12 equal parts.
5. Circle: (c) construction of tangent and normal to a circle; tangent from a point outside the circle and to one or two equal circles.
- Locating the centre of a circle
6. Triangles: Triangles and circles: Right angled, equilateral. Isosceles and scalene triangles. Inscribed and circumscribed circles to given triangles
7. Quadrilateral and polygons: (a) definitions and constructions of regular quadrilaterals: rectangles, square, rhombus, parallelogram and trapezium, etc. (b) definition and construction of regular and irregular polygons, pentagon, hexagon, heptagon, octagon, using general and specific methods.
8. Plane Figures: Construction of areas of regular plane figures, e.g. (i) triangles and rectangles of equal areas (ii) square and rectangles of equal areas, etc.
9. Enlargement and Reduction of Plane Figures: Triangles, rectangles and squares in given ratios by length of sides. Radial line methods.
10. Practical Project
11. Revision
OLD SCHEME OF WORK
WEEKS TOPICS
1. Revision of last term's work
- Triangles:
- Definition and types,
- Construction and sketches
3. Quadrilaterals and Polygons:
- Definition, types,
- Construction and Sketches
4. Area of plane figure:
- Enlargement/reduction of regular plane figure
- Useful theorems of finding areas.
- Illustrations.
5. Miscellaneous Construction:
- Dividing a straight line into equal parts.
- Finding the centre
6. Miscellaneous Construction:
- Inscribing a square in a circle,
- Inscribing an equilateral triangle in a circle
7. Miscellaneous Construction:
- Drawing of arcs of a given radius:
- Drawing of tangents to two lines.
8. Miscellaneous Construction:
- Inscribing a circle round an equilateral triangle.
- Inscribing a circle within a given triangle
12 Revision
2ND TERM
WEEK 1
LESSON 1
SPECIFIC TOPIC : Revision
REFERENCE BK : Basic technology for JSS by Evans and Nation Building Basic Tech-
nology 2.k
PERFORMANCE OBJECTIVE: At the end of the lesson the students should be able to:
(1).answers questions correctly from the last term's Examination
(2).ask questions from last term's work
View content
https://drive.google.com/file/d/1okk8X2 ... sp=sharing
EVALUATION/CLASSWORK :
(1).What is the full meaning of ICT?
(2).What is the full meaning of GSM and ISP?
(3).Describe the internet
(4).Mention first aid materials
(5).Define Lines
(6).Mention different types of lines
LESSON 2
MAIN TOPIC : Triangles
SPECIFIC TOPIC : Meaning and types of triangles
REFERENCE BK :Basic technology for JSS by Evans and Nation Building Basic Technology by E.K AJAYI.
PERFORMANCE OBJECTIVE: At the end of the lesson the students should be able to:
(1) define triangle
(2) mention types of triangles.
CONTENT : TRIANGLES
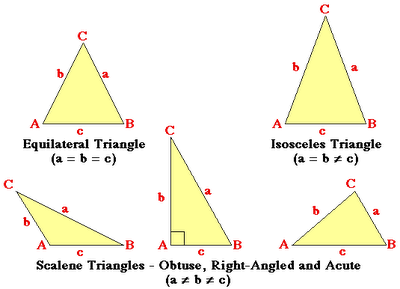
Triangles are plane figures bounded with three straight lines; the lines of a triangle are called sides. The sum of the angles of a triangle is 180˚.Triangles are grouped in two ways according to their sides and according to their angles.
TYPES OF TRIANGLE ACCORDING TO THEIR SIDES
Equilateral triangle: All sides equal
Isosceles triangle: Two sides equal
Scalene triangle: Non of the sides equal
TYPES OF TRIANGLES ACCORDING TO THEIR ANGLE
Obtuse angled triangle : One of the angles is greater than 90
Acute angled triangle: All the the angles are less than 90
Right angled triangle :One of the angles is 90
EVALUATION/CLASSWORK
(1)Defines triangle
(2)Mention and explain the types of triangles
ASSIGNMENT:
Draw the types of triangle according to their sides
further studies
http://www.mathsisfun.com/triangle.html
http://www.1728.org/triang.htm
http://www.aaamath.com/geo318x3.htm
http://www.factmonster.com/ipka/A0876325.html
practice test
http://www.softschools.com/testing/math/theme1.html
http://www.ixl.com/math/grade-8/classify-triangles
http://www.mathsisfun.com/geometry/tria ... ruent.html
http://www.proprofs.com/quiz-school/qui ... &quesnum=1
http://www.mathopenref.com/quiztriangle1.html
http://www.syvum.com/cgi/online/serve.c ... stion_hide
LESSON 3
TOPIC: TRIANGLES
SUB-TOPICS:
1. Triangle and its types
2. Inscribed and circumscribed circles in a given triangle
Triangle and its types
A triangle is a plane figure bounded by three straight lines. The figure below shows the typical shape of a triangle. The sum total of all the angles in a triangle is 1800. Triangles are described by
1. The lengths of their sides
2. The sizes of their angle; and
3. A combination of both lengths of sides and sizes of angles
Types of triangle
1. Right angled triangle: - a right-angled triangle has one angle equal to 900. The side opposite the 900 is called the hypotenuse.
2. Equilateral triangle: - An equilateral triangle has all the three sides and angles equal.
3. Isosceles triangle: an Isosceles triangle has two equal sides and angles
4. Scalene triangles: - a scalene triangle has three unequal sides and angles.
5. Obtuse-angled triangle:- it has one of its angles more than 900
https://youtu.be/mLeNaZcy-hE
Evaluation
1. What is a triangle
2. List and explain three types of triangle
LESSON 4
Inscribed and circumscribed circles to a given triangle
Inscribed circle to a given triangle

https://youtu.be/l2LOAXYU3UU
The three sides of the given triangle are tangential to the inscribed circle
The procedure for drawing the inscribed circle to a given triangle is as follows:
1. Draw the given triangle ABC.
2. Bisect any two angles of the triangle. The bisecting lines will intersect at O, which is the centre of the inscribed circle.
3. Draw a perpendicular lines to any sides from O to meet the sides at D
4. With O as centre and radius OD draw the inscribed circle.
https://youtu.be/M3PzKMYeeC0
Circumscribed circle to a given triangles
The circumference of the circumscribed circle to a given triangle touches the vertices of the given triangle.

https://youtu.be/YEX2mhvbYuo
The procedure for drawing the circumscribed circle to a given triangle is as follows:
1. Draw the given triangle ABC
2. Bisect any two sides of the given triangle. The bisecting lines intersect at O, which is the centre of the circumscribed circle.
3. With O as centre and radius AO draw the circumscribed circle.
Evaluation
1. Inscribe a circle inside an equilateral triangle of side 10cm
2. Circumscribe a circle outside an equilateral triangle of side 8cm
Reading Assignment
NERDC Basic Technology for Junior Secondary School 2 chapter 6 pages
46-50
Weekend Assignment
1. Draw a triangle whose sides are 4cm, 5cm and 6cm
2. Draw a triangle having a base of 6cm and angles of 400 and 700 at the ends respectively.
3. Construct a triangle having sides of 8cm,6cm and 5cm. draw
1. The inscribed circle of the triangle.
2. The circumscribed circle of the triangle
3. Construct and name the triangle ABC given that AB= 11cm, BC = 8cm and angle ABC = 1100.
4. Draw a right angled triangle given that the length of one side is 8cm and one angle is 400.
LESSON 5
MAIN TOPIC : Processing of materials
SPECIFIC TOPIC : Processing of metal
REFERENCE BK : Basic technology for JSS by Evans and Nation Building Basic Technology by E.K AJAYI.
PERFORMANCE OBJECTIVE: At the end of the lesson the students should be able to:
(1) explain the procedure in processing of metal
(2)mention all the materials used in processing of metal
CONTENT
PROCESSING OF METAL
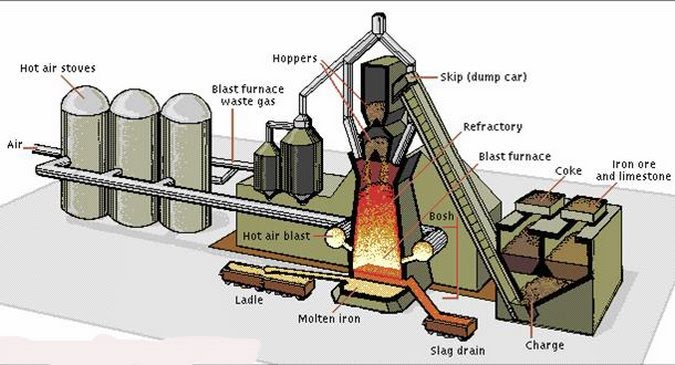
Iron ore is the first material needed for the processing of metal. The iron ore and
other materials such as coke and limestone are loaded into a device called BLAST FURNACE .The blast furnace produces a blast of hot air which heats the limestone
and iron ore to produce a molten iron .The molten iron is then transferred to a
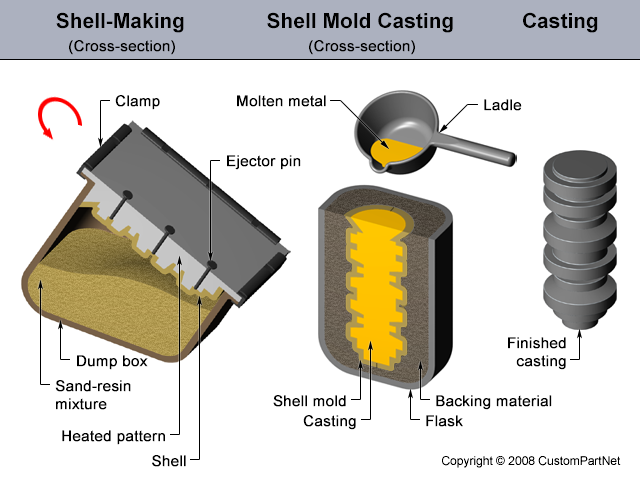
Ladle which will be used to transfer the molten iron to the mould. Here in the
molten iron will be allowed to cool down and form the first metal called PIG IRON.
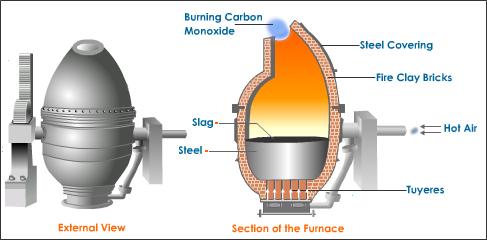
Blast Furnace, ore-refining shaft furnace operating on the principle that a blast of air forced through a mixture of solid fuel and ore burns away unwanted impurities or converts them to insoluble slag, which can then be skimmed off. The name is usually restricted to metallurgical furnaces for the reduction of ores and particularly to the furnace used for the manufacture of pig iron from iron ore
SMELTING: is the process of extracting metal from ore.
CASTING: is the method of putting liquid metal into the mould.
EVALUATION/CLASSWORK
Explain the procedure in the processing of metal
What is the name of the first metal?
Mention the material to be used in the processing of metal.
further studies
https://en.wikipedia.org/wiki/Metalworking
http://depts.washington.edu/matseed/mse ... essing.htm
LESSON 6
MAIN TOPIC : Processing of metal
SPECIFIC TOPIC : Processing of pig iron to steel
REFERENCE BK : Basic technology for JSS by Evans and Nation Building Basic Technology by E.K AJAYI.
PERFORMANCE OBJECTIVE: At the end of the lesson the students should be able to:
(1) explain the process of making iron to steel
(2) mention all the furnaces used in processing steel
CONTENT
PROCESSING OF PIG IRON TO STEEL
Pig iron is first metal produced in the processing of metal and this iron is not good
for any engineering work therefore it must be processed into steel and other forms
of metal.
The main difference between steel and pig iron is the carbon content. Pig iron has
3-5% carbon while steel contains less than 2% carbon. In making carbon it is necessary to remove some carbon from pig iron. To remove carbon from pig iron different furnaces are used:-
1.Bessemer converter: for removing carbon from pig iron.
2.Open hearth furnace : for making stainless steel.
3.Electric furnace :for making steel.
4. Reverberatory furnace :for melting non-ferrous metal.
Bessemer Steel Production
In order to convert molten pig iron (crude iron) into steel with a Bessemer furnace, air must be blown through it to burn away impurities. This engraving of a steel factory illustrates the process developed by Sir Henry Bessemer in 1855 and used until the 1950s.
View picture
EVALUATION/CLASSWORK
Explain the process of producing steel.
Mention all the furnaces used in removing carbon from pig iron.
further studies
http://www.howstuffworks.com/iron4.htm
http://www.encyclopedia.com/topic/blast ... stfur-full
http://www.brighthubengineering.com/man ... -smelting/
practice test
http://chemistry.about.com/library/weekly/bl050303a.htm
http://quizlet.com/4319663/test/
http://flashcarddb.com/cardset/quiz/73925
SPECIFIC TOPIC : Revision
REFERENCE BK : Basic technology for JSS by Evans and Nation Building Basic Tech-
nology 2.k
PERFORMANCE OBJECTIVE: At the end of the lesson the students should be able to:
(1).answers questions correctly from the last term's Examination
(2).ask questions from last term's work
View content
https://drive.google.com/file/d/1okk8X2 ... sp=sharing
EVALUATION/CLASSWORK :
(1).What is the full meaning of ICT?
(2).What is the full meaning of GSM and ISP?
(3).Describe the internet
(4).Mention first aid materials
(5).Define Lines
(6).Mention different types of lines
LESSON 2
MAIN TOPIC : Triangles
SPECIFIC TOPIC : Meaning and types of triangles
REFERENCE BK :Basic technology for JSS by Evans and Nation Building Basic Technology by E.K AJAYI.
PERFORMANCE OBJECTIVE: At the end of the lesson the students should be able to:
(1) define triangle
(2) mention types of triangles.
CONTENT : TRIANGLES
Triangles are plane figures bounded with three straight lines; the lines of a triangle are called sides. The sum of the angles of a triangle is 180˚.Triangles are grouped in two ways according to their sides and according to their angles.
TYPES OF TRIANGLE ACCORDING TO THEIR SIDES
Equilateral triangle: All sides equal
Isosceles triangle: Two sides equal
Scalene triangle: Non of the sides equal
TYPES OF TRIANGLES ACCORDING TO THEIR ANGLE
Obtuse angled triangle : One of the angles is greater than 90
Acute angled triangle: All the the angles are less than 90
Right angled triangle :One of the angles is 90
EVALUATION/CLASSWORK
(1)Defines triangle
(2)Mention and explain the types of triangles
ASSIGNMENT:
Draw the types of triangle according to their sides
further studies
http://www.mathsisfun.com/triangle.html
http://www.1728.org/triang.htm
http://www.aaamath.com/geo318x3.htm
http://www.factmonster.com/ipka/A0876325.html
practice test
http://www.softschools.com/testing/math/theme1.html
http://www.ixl.com/math/grade-8/classify-triangles
http://www.mathsisfun.com/geometry/tria ... ruent.html
http://www.proprofs.com/quiz-school/qui ... &quesnum=1
http://www.mathopenref.com/quiztriangle1.html
http://www.syvum.com/cgi/online/serve.c ... stion_hide
LESSON 3
TOPIC: TRIANGLES
SUB-TOPICS:
1. Triangle and its types
2. Inscribed and circumscribed circles in a given triangle
Triangle and its types
A triangle is a plane figure bounded by three straight lines. The figure below shows the typical shape of a triangle. The sum total of all the angles in a triangle is 1800. Triangles are described by
1. The lengths of their sides
2. The sizes of their angle; and
3. A combination of both lengths of sides and sizes of angles
Types of triangle
1. Right angled triangle: - a right-angled triangle has one angle equal to 900. The side opposite the 900 is called the hypotenuse.
2. Equilateral triangle: - An equilateral triangle has all the three sides and angles equal.
3. Isosceles triangle: an Isosceles triangle has two equal sides and angles
4. Scalene triangles: - a scalene triangle has three unequal sides and angles.
5. Obtuse-angled triangle:- it has one of its angles more than 900
https://youtu.be/mLeNaZcy-hE
Evaluation
1. What is a triangle
2. List and explain three types of triangle
LESSON 4
Inscribed and circumscribed circles to a given triangle
Inscribed circle to a given triangle
https://youtu.be/l2LOAXYU3UU
The three sides of the given triangle are tangential to the inscribed circle
The procedure for drawing the inscribed circle to a given triangle is as follows:
1. Draw the given triangle ABC.
2. Bisect any two angles of the triangle. The bisecting lines will intersect at O, which is the centre of the inscribed circle.
3. Draw a perpendicular lines to any sides from O to meet the sides at D
4. With O as centre and radius OD draw the inscribed circle.
https://youtu.be/M3PzKMYeeC0
Circumscribed circle to a given triangles
The circumference of the circumscribed circle to a given triangle touches the vertices of the given triangle.
https://youtu.be/YEX2mhvbYuo
The procedure for drawing the circumscribed circle to a given triangle is as follows:
1. Draw the given triangle ABC
2. Bisect any two sides of the given triangle. The bisecting lines intersect at O, which is the centre of the circumscribed circle.
3. With O as centre and radius AO draw the circumscribed circle.
Evaluation
1. Inscribe a circle inside an equilateral triangle of side 10cm
2. Circumscribe a circle outside an equilateral triangle of side 8cm
Reading Assignment
NERDC Basic Technology for Junior Secondary School 2 chapter 6 pages
46-50
Weekend Assignment
1. Draw a triangle whose sides are 4cm, 5cm and 6cm
2. Draw a triangle having a base of 6cm and angles of 400 and 700 at the ends respectively.
3. Construct a triangle having sides of 8cm,6cm and 5cm. draw
1. The inscribed circle of the triangle.
2. The circumscribed circle of the triangle
3. Construct and name the triangle ABC given that AB= 11cm, BC = 8cm and angle ABC = 1100.
4. Draw a right angled triangle given that the length of one side is 8cm and one angle is 400.
LESSON 5
MAIN TOPIC : Processing of materials
SPECIFIC TOPIC : Processing of metal
REFERENCE BK : Basic technology for JSS by Evans and Nation Building Basic Technology by E.K AJAYI.
PERFORMANCE OBJECTIVE: At the end of the lesson the students should be able to:
(1) explain the procedure in processing of metal
(2)mention all the materials used in processing of metal
CONTENT
PROCESSING OF METAL
Iron ore is the first material needed for the processing of metal. The iron ore and
other materials such as coke and limestone are loaded into a device called BLAST FURNACE .The blast furnace produces a blast of hot air which heats the limestone
and iron ore to produce a molten iron .The molten iron is then transferred to a
Ladle which will be used to transfer the molten iron to the mould. Here in the
molten iron will be allowed to cool down and form the first metal called PIG IRON.
Blast Furnace, ore-refining shaft furnace operating on the principle that a blast of air forced through a mixture of solid fuel and ore burns away unwanted impurities or converts them to insoluble slag, which can then be skimmed off. The name is usually restricted to metallurgical furnaces for the reduction of ores and particularly to the furnace used for the manufacture of pig iron from iron ore
SMELTING: is the process of extracting metal from ore.
CASTING: is the method of putting liquid metal into the mould.
EVALUATION/CLASSWORK
Explain the procedure in the processing of metal
What is the name of the first metal?
Mention the material to be used in the processing of metal.
further studies
https://en.wikipedia.org/wiki/Metalworking
http://depts.washington.edu/matseed/mse ... essing.htm
LESSON 6
MAIN TOPIC : Processing of metal
SPECIFIC TOPIC : Processing of pig iron to steel
REFERENCE BK : Basic technology for JSS by Evans and Nation Building Basic Technology by E.K AJAYI.
PERFORMANCE OBJECTIVE: At the end of the lesson the students should be able to:
(1) explain the process of making iron to steel
(2) mention all the furnaces used in processing steel
CONTENT
PROCESSING OF PIG IRON TO STEEL
Pig iron is first metal produced in the processing of metal and this iron is not good
for any engineering work therefore it must be processed into steel and other forms
of metal.
The main difference between steel and pig iron is the carbon content. Pig iron has
3-5% carbon while steel contains less than 2% carbon. In making carbon it is necessary to remove some carbon from pig iron. To remove carbon from pig iron different furnaces are used:-
1.Bessemer converter: for removing carbon from pig iron.
2.Open hearth furnace : for making stainless steel.
3.Electric furnace :for making steel.
4. Reverberatory furnace :for melting non-ferrous metal.
Bessemer Steel Production
In order to convert molten pig iron (crude iron) into steel with a Bessemer furnace, air must be blown through it to burn away impurities. This engraving of a steel factory illustrates the process developed by Sir Henry Bessemer in 1855 and used until the 1950s.
View picture
EVALUATION/CLASSWORK
Explain the process of producing steel.
Mention all the furnaces used in removing carbon from pig iron.
further studies
http://www.howstuffworks.com/iron4.htm
http://www.encyclopedia.com/topic/blast ... stfur-full
http://www.brighthubengineering.com/man ... -smelting/
practice test
http://chemistry.about.com/library/weekly/bl050303a.htm
http://quizlet.com/4319663/test/
http://flashcarddb.com/cardset/quiz/73925
WEEK 2
LESSON 7
TOPIC: GEOMETRIC CONSTRUCTION (ANGLES)
SUB-TOPICS:
1. Definition and Illustration of Angles
2. Definition and Illustration of Angles (cont’d)
Definition and Illustration of Angles
What is an angle?
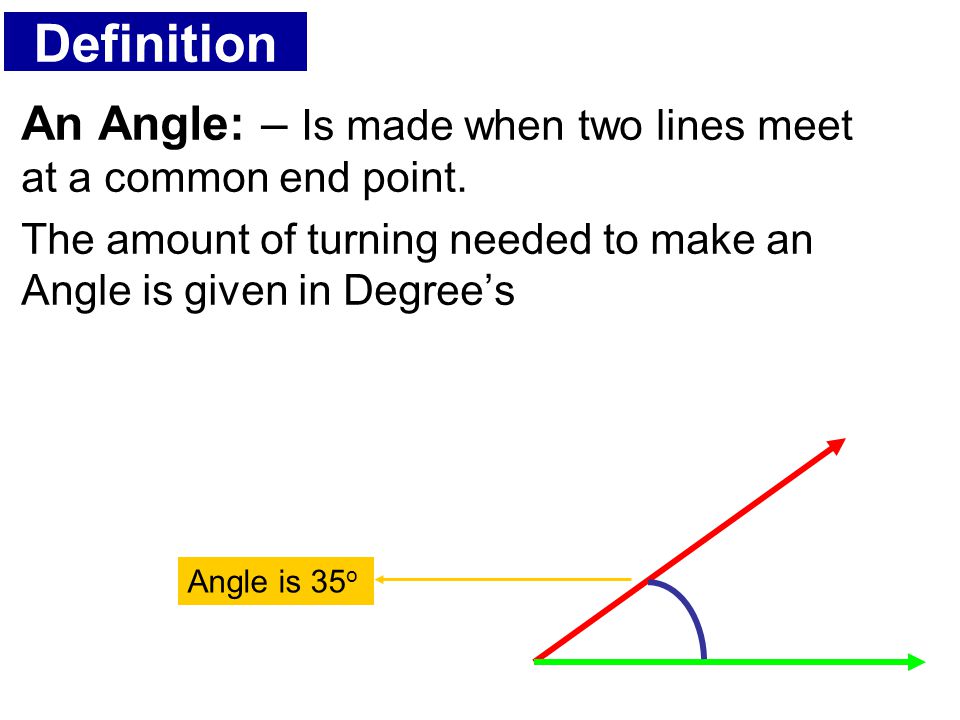
An angle is defined as a space between two inclined lines meeting at a point. It is measured in degree with the use of protractor
Types of Angles
1. Right Angle: This is an angle which is 900
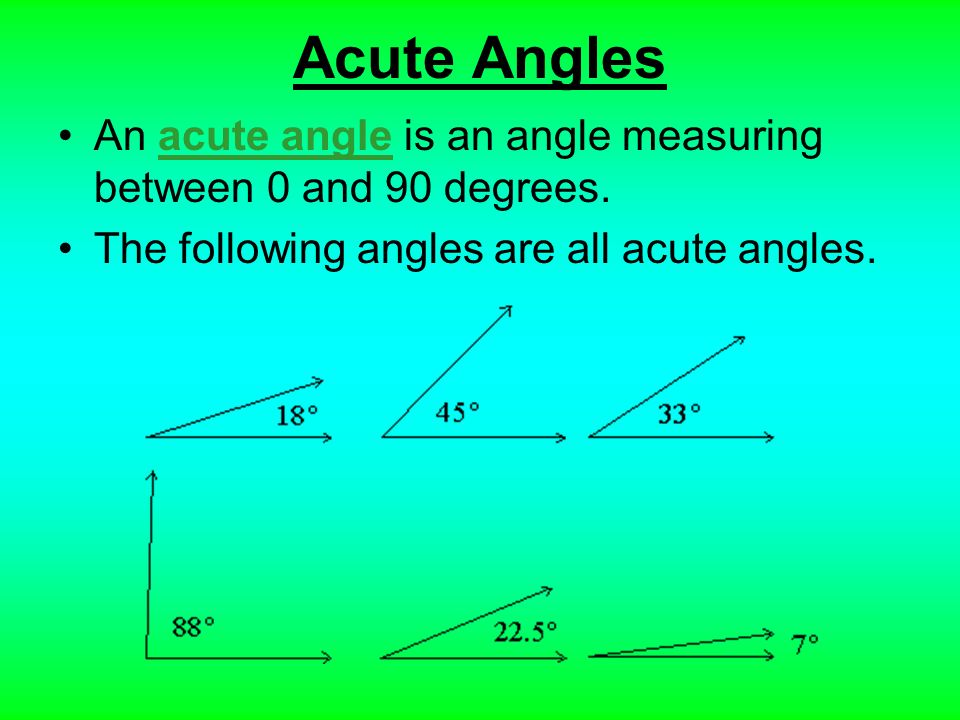
2. Acute Angle: This is an angle which is less than 900
Evaluation
1. What is an angle
2. Describe: i) Right Angle ii) Acute Angle
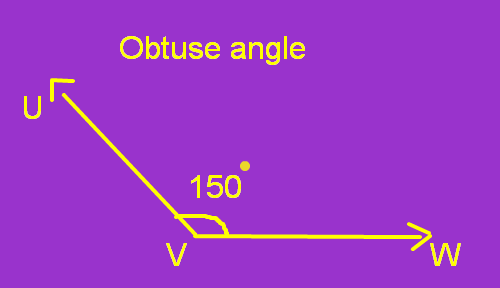
3. Obtuse angle: This is an angle which is more than 900 but less than 1800
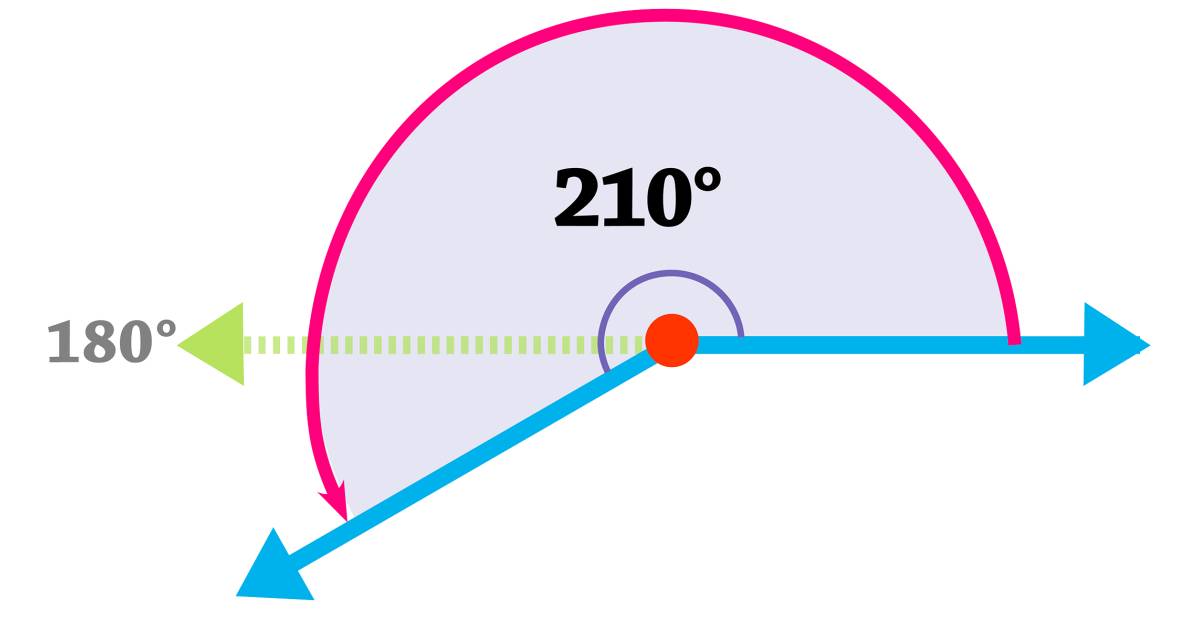
4. Reflex angle: This is an angle which is more than 1800 but less than 3600
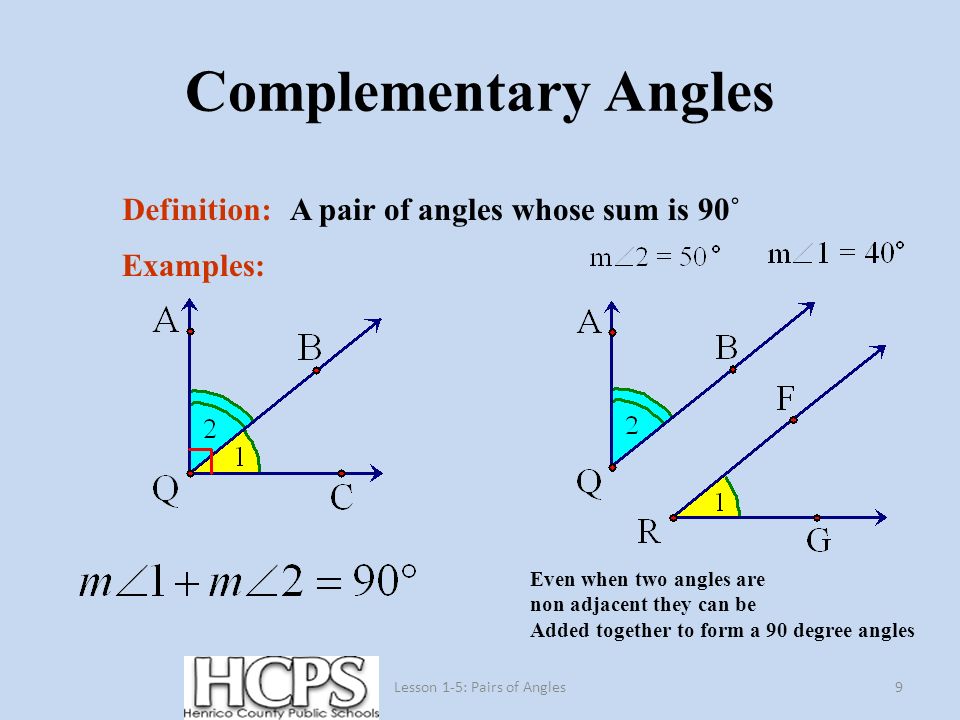
5. Complementary angle: This is the angle whose sum adds up to 900
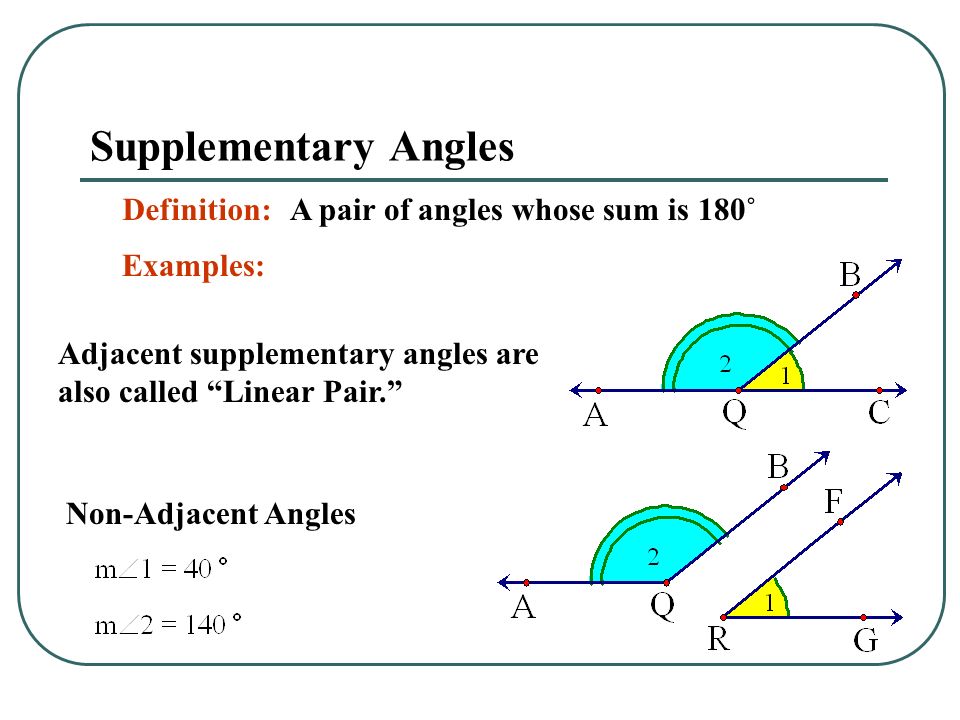
6. Supplementary angle: This is the angle whose sum adds up to1800
Evaluation
1. Describe the following angles;
1. Reflex
2. Obtuse
3. Right angle
READING ASSIGNMENT: NERDC BASIC TECHNOLOGY FOR JUNIOR SECONDARY SCHOOLS BOOK 2 Chapter 5 Pages 32 - 39
ASSIGNMENT
Draw and explain the following angles:
1. Supplementary angle
2. Complementary angle
Further Studies
Further Studies 1
Further Studies 2
Practice Test 1
Worksheet
LESSON 8
TOPIC: QUADRILATERALS AND POLYGONS
SUB-TOPICS:
1. Quadrilateral
2. Regular and Irregular Polygons
QUADRILATERAL
What is a Quadrilateral?
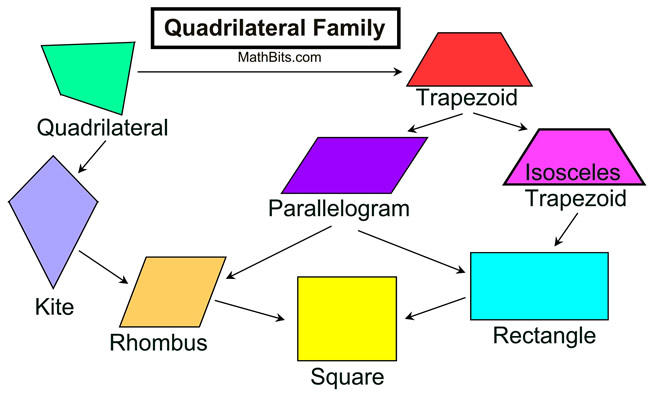
A quadrilateral is a plane figure bounded by four straight sides and whose four angles add up to 3600. The line joining two opposite corners of quadrilateral is known as diagonal.
Examples of Quadrilateral
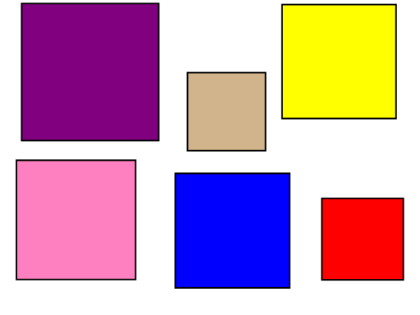
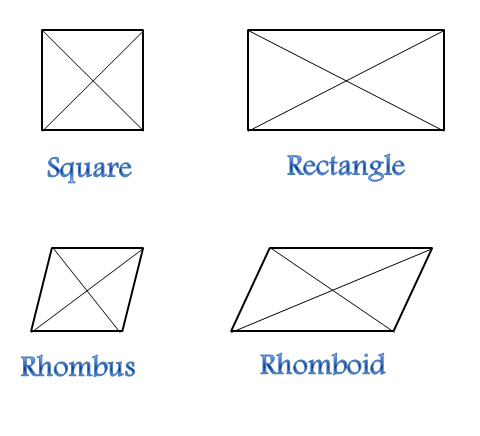
1. Squares
2. Rectangle
3. Parallelogram
4. Rhombus
5. Trapezium
6. Kite etc.
https://youtu.be/yiREqzDsMP8
Construction of A Square
E.g.: How to construct a square given that one of its sides is 60mm
Procedures
1. Draw the given side AB to be 60 mm.
2. With centre A and a convenient radius, draw a semicircle at A. use the semicircle to draw a vertical line at AC
3. With center A and a radius AB, draw an arc to cut the vertical line at D with center B and with the same radius, draw an arc at C. Again with center D and the same radius, draw another arc to cut the one at C.
4. Join point D to C and C to B. ABCD is the square required.
https://youtu.be/sqEiFKsPBtg
Construction of a Rectangle
E.g.: Constructing a rectangle 60mm in length and 35mm in width
Procedure
1. Draw line AB 60mm to be the horizontal length.
2. Construct a perpendicular at B, and on the perpendicular lines, mark off 35mm at C, using your compass.
3. With center A and Radius 35mm, draw an arc at D.
4. With center C and radius AB (60mm),draw an arc to cut the initial arc at D
5. Join C to D and D to give rectangle ABCD.
https://youtu.be/-ELNDgbRQi4
Construction of a Rhombus
Constructing a rhombus given its sides and diagonal
Procedure
1. Draw a line and mark off AB equal to the given diagonal.
2. With center A and a radius equal to the side, draw arcs above and below AB.
3. With center B and the same radius, cut the previous arcs at C and D.
4. Join ADAC, CB, and BD to obtain the required rhombus ACBD
https://youtu.be/nKg_btgUonw
Construction of a Parallelogram
Constructing a parallelogram given the diagonals and an angle between them
Procedure:
1. Draw the given diagonals AC first to be 60mm and DB 80mm.
2. Bisect AC at E.
3. Through E, construct the given angle to be 450
4. Make EB and ED equal to, say 40mm, while AE is 30mm and EC is 30mm.
5. Join A to D, D to C, C to D and B to OA.
https://youtu.be/ynRl9KIEa8w
https://youtu.be/NpNHjAwMIhk
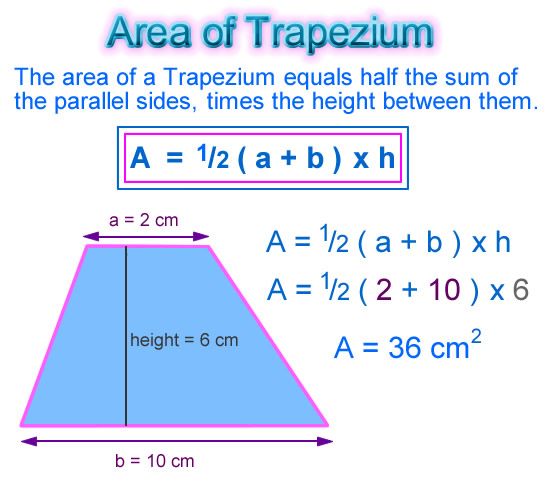
Construction of Trapezium
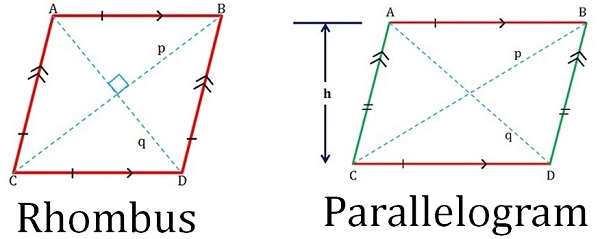
A trapezium is a quadrilateral with only two parallel sides. The diagonals of a trapezium intersect each other to give equal opposite angles.
https://youtu.be/Fd8E7IkXnfI
Evaluation
Construct the following quadrilaterals:
1. Square
2. Rectangle
3. Parallelogram
LESSON 9
Regular and Irregular Polygons
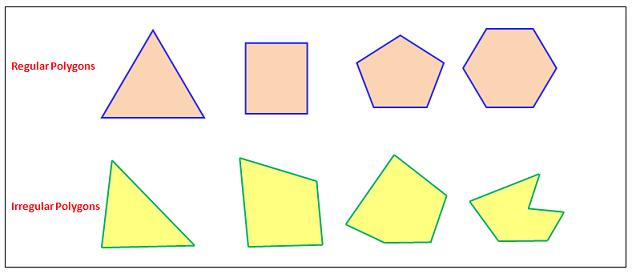
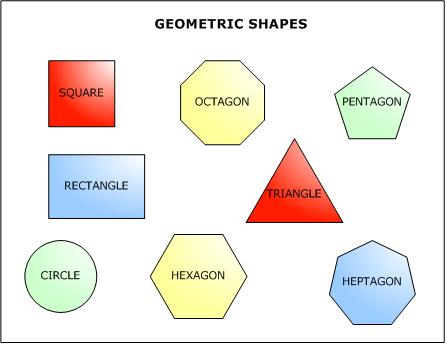
A polygon is a plane figure bounded by three or more straight line segments e.g. quadrilateral, hexagon, heptagon, octagon, and pentagon. A polygon can either be regular or irregular.
Regular Polygon
A regular polygon is one that has all sides equal
Irregular Polygon
Irregular polygon is one that has unequal sides
https://youtu.be/IaoZhhx_I9s
Construction of hexagon using a pair of compasses
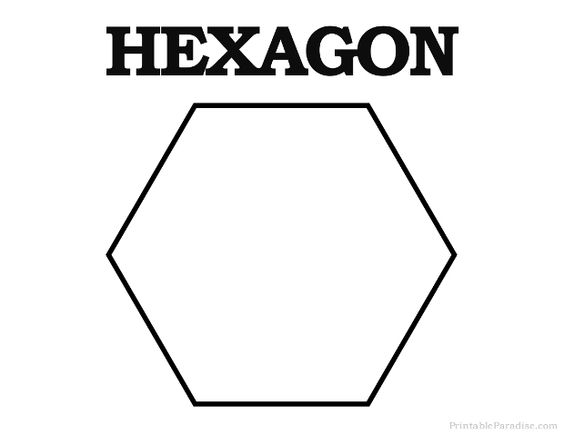
Hexagon is a figure with six sides
Procedure
1. Draw a circle with radius equal to the length of the side given, and draw the horizontal diameter
2. With A as center, and the same radius (30mm), cut the circle above to give AC, and below to give AD
3. With B as center, and the same radius (30mm), cut the circle above to give BE, and below to give BF.
4. Join AD,DF, FB ,AC, BE and CE to obtain the required hexagon
https://youtu.be/C-jrTm2LtME
Construction of Pentagon using a pair of compasses
1. USING GENERAL METHODS i.e. EXTERNAL ANGLE = 3600/N
PROCEDURE
1. Obtain the external angle of the required polygon by dividing 3600 by the number of sides (N), i.e. 5 for a pentagon is 3600/5 = 720
2. Draw a horizontal line and mark off AB equal to the given base
3. With A and B as centers, using protractor, mark off 720 as external angles at both ends; and also mark off lengths equal to AB at both A and B points, to give the required pentagon.
4. With C and D as centers, using the protractor, mark off 720 again and extend the lines to intersect at E to give the required pentagon
5. The figure ABDEC is the required pentagon.
https://youtu.be/qB5X5uem9a4
6. USING SPECIFIC METHOD i.e. TWO TRIANGLE RULE
PROCEDURES
1. Draw a horizontal line and mark off AB equal to the given base
2. Bisect AB and produce its bisector as long as it is convenient.
3. On AB as base, draw an isosceles triangle with base angle 450 and an equilateral triangle, so that the apexes of the two triangles lie on the bisector of AB. Mark the apex of the isosceles triangle as D, and that of the equilateral triangle as F.
4. Bisect FD to obtain point C
5. Along the bisector of AB, from the point F, step off the length DE or EF to obtain points G, H, I etc.
6. Join the marked points on the circumference of the circle, to obtain the required pentaon ABCDE
NOTE; the points d, e ,f, g, h, I are the centers of various polygons.
https://youtu.be/Ph6xGaMCXPs
Construction of Octagon using a pair of compasses
PROCEDURE
1. Draw a horizontal line and mark off the length of the given side AB
2. Through A and B, draw lines at 450 (3600/8) and mark off AC and BD to equal the length of AB
3. Through C and D, draw vertical line and mark off CE and CF to equal length of AB
4. Through E and F, draw lines at 450 and mark off EG and FG equal in length to AB.
5. Join GH to complete the octagon.
6. ABDFHGEC is the obtained octagon.
https://youtu.be/PIqk2mGcWVk
EVALUATION
Describe how to construct the following polygons;
1. Pentagon
2. Octagon
3. Hexagon
READING ASSIGNMENT
NERDC Basic Technology for Junior Secondary School I Chapter 7 Pages 52 - 60
ASSIGNMENT
1. Construct a pentagon using general method
2. Highlight properties of hexagons
TOPIC: GEOMETRIC CONSTRUCTION (ANGLES)
SUB-TOPICS:
1. Definition and Illustration of Angles
2. Definition and Illustration of Angles (cont’d)
Definition and Illustration of Angles
What is an angle?
An angle is defined as a space between two inclined lines meeting at a point. It is measured in degree with the use of protractor
Types of Angles
1. Right Angle: This is an angle which is 900
2. Acute Angle: This is an angle which is less than 900
Evaluation
1. What is an angle
2. Describe: i) Right Angle ii) Acute Angle
3. Obtuse angle: This is an angle which is more than 900 but less than 1800
4. Reflex angle: This is an angle which is more than 1800 but less than 3600
5. Complementary angle: This is the angle whose sum adds up to 900
6. Supplementary angle: This is the angle whose sum adds up to1800
Evaluation
1. Describe the following angles;
1. Reflex
2. Obtuse
3. Right angle
READING ASSIGNMENT: NERDC BASIC TECHNOLOGY FOR JUNIOR SECONDARY SCHOOLS BOOK 2 Chapter 5 Pages 32 - 39
ASSIGNMENT
Draw and explain the following angles:
1. Supplementary angle
2. Complementary angle
Further Studies
Further Studies 1
Further Studies 2
Practice Test 1
Worksheet
LESSON 8
TOPIC: QUADRILATERALS AND POLYGONS
SUB-TOPICS:
1. Quadrilateral
2. Regular and Irregular Polygons
QUADRILATERAL
What is a Quadrilateral?
A quadrilateral is a plane figure bounded by four straight sides and whose four angles add up to 3600. The line joining two opposite corners of quadrilateral is known as diagonal.
Examples of Quadrilateral
1. Squares
2. Rectangle
3. Parallelogram
4. Rhombus
5. Trapezium
6. Kite etc.
https://youtu.be/yiREqzDsMP8
Construction of A Square
E.g.: How to construct a square given that one of its sides is 60mm
Procedures
1. Draw the given side AB to be 60 mm.
2. With centre A and a convenient radius, draw a semicircle at A. use the semicircle to draw a vertical line at AC
3. With center A and a radius AB, draw an arc to cut the vertical line at D with center B and with the same radius, draw an arc at C. Again with center D and the same radius, draw another arc to cut the one at C.
4. Join point D to C and C to B. ABCD is the square required.
https://youtu.be/sqEiFKsPBtg
Construction of a Rectangle
E.g.: Constructing a rectangle 60mm in length and 35mm in width
Procedure
1. Draw line AB 60mm to be the horizontal length.
2. Construct a perpendicular at B, and on the perpendicular lines, mark off 35mm at C, using your compass.
3. With center A and Radius 35mm, draw an arc at D.
4. With center C and radius AB (60mm),draw an arc to cut the initial arc at D
5. Join C to D and D to give rectangle ABCD.
https://youtu.be/-ELNDgbRQi4
Construction of a Rhombus
Constructing a rhombus given its sides and diagonal
Procedure
1. Draw a line and mark off AB equal to the given diagonal.
2. With center A and a radius equal to the side, draw arcs above and below AB.
3. With center B and the same radius, cut the previous arcs at C and D.
4. Join ADAC, CB, and BD to obtain the required rhombus ACBD
https://youtu.be/nKg_btgUonw
Construction of a Parallelogram
Constructing a parallelogram given the diagonals and an angle between them
Procedure:
1. Draw the given diagonals AC first to be 60mm and DB 80mm.
2. Bisect AC at E.
3. Through E, construct the given angle to be 450
4. Make EB and ED equal to, say 40mm, while AE is 30mm and EC is 30mm.
5. Join A to D, D to C, C to D and B to OA.
https://youtu.be/ynRl9KIEa8w
https://youtu.be/NpNHjAwMIhk
Construction of Trapezium
A trapezium is a quadrilateral with only two parallel sides. The diagonals of a trapezium intersect each other to give equal opposite angles.
https://youtu.be/Fd8E7IkXnfI
Evaluation
Construct the following quadrilaterals:
1. Square
2. Rectangle
3. Parallelogram
LESSON 9
Regular and Irregular Polygons
A polygon is a plane figure bounded by three or more straight line segments e.g. quadrilateral, hexagon, heptagon, octagon, and pentagon. A polygon can either be regular or irregular.
Regular Polygon
A regular polygon is one that has all sides equal
Irregular Polygon
Irregular polygon is one that has unequal sides
https://youtu.be/IaoZhhx_I9s
Construction of hexagon using a pair of compasses
Hexagon is a figure with six sides
Procedure
1. Draw a circle with radius equal to the length of the side given, and draw the horizontal diameter
2. With A as center, and the same radius (30mm), cut the circle above to give AC, and below to give AD
3. With B as center, and the same radius (30mm), cut the circle above to give BE, and below to give BF.
4. Join AD,DF, FB ,AC, BE and CE to obtain the required hexagon
https://youtu.be/C-jrTm2LtME
Construction of Pentagon using a pair of compasses
1. USING GENERAL METHODS i.e. EXTERNAL ANGLE = 3600/N
PROCEDURE
1. Obtain the external angle of the required polygon by dividing 3600 by the number of sides (N), i.e. 5 for a pentagon is 3600/5 = 720
2. Draw a horizontal line and mark off AB equal to the given base
3. With A and B as centers, using protractor, mark off 720 as external angles at both ends; and also mark off lengths equal to AB at both A and B points, to give the required pentagon.
4. With C and D as centers, using the protractor, mark off 720 again and extend the lines to intersect at E to give the required pentagon
5. The figure ABDEC is the required pentagon.
https://youtu.be/qB5X5uem9a4
6. USING SPECIFIC METHOD i.e. TWO TRIANGLE RULE
PROCEDURES
1. Draw a horizontal line and mark off AB equal to the given base
2. Bisect AB and produce its bisector as long as it is convenient.
3. On AB as base, draw an isosceles triangle with base angle 450 and an equilateral triangle, so that the apexes of the two triangles lie on the bisector of AB. Mark the apex of the isosceles triangle as D, and that of the equilateral triangle as F.
4. Bisect FD to obtain point C
5. Along the bisector of AB, from the point F, step off the length DE or EF to obtain points G, H, I etc.
6. Join the marked points on the circumference of the circle, to obtain the required pentaon ABCDE
NOTE; the points d, e ,f, g, h, I are the centers of various polygons.
https://youtu.be/Ph6xGaMCXPs
Construction of Octagon using a pair of compasses
PROCEDURE
1. Draw a horizontal line and mark off the length of the given side AB
2. Through A and B, draw lines at 450 (3600/8) and mark off AC and BD to equal the length of AB
3. Through C and D, draw vertical line and mark off CE and CF to equal length of AB
4. Through E and F, draw lines at 450 and mark off EG and FG equal in length to AB.
5. Join GH to complete the octagon.
6. ABDFHGEC is the obtained octagon.
https://youtu.be/PIqk2mGcWVk
EVALUATION
Describe how to construct the following polygons;
1. Pentagon
2. Octagon
3. Hexagon
READING ASSIGNMENT
NERDC Basic Technology for Junior Secondary School I Chapter 7 Pages 52 - 60
ASSIGNMENT
1. Construct a pentagon using general method
2. Highlight properties of hexagons
WEEK 3
LESSON 10
MAIN TOPIC : Quadrilaterals
SPECIFIC TOPIC : Definition and meaning
REFERENCE BK : Basic technology for JSS by Evans and Nation Building Basic Technology by E.K AJAYI.
PERFORMANCE OBJECTIVES: At the end of the lesson the students should be able to:
(1) Mention all the quadrilaterals
(2) State the features of each quadrilateral
QUADRILATERALS
Quadrilaterals are plane figures bounded by four straight lines. Sum of the angles of a quadrilateral is 360˚.The common quadrilaterals are:
Square.
Rectangle.
Rhombus
Parallelogram
Trapezium
https://youtu.be/yiREqzDsMP8
Square: are plane figures with four equal straight sides and equal angles of 90˚ each.
Rectangle: these are plane figures with the two opposite sides equal and all the angles 90

Rhombus
A four-sided shape where all sides have equal length.
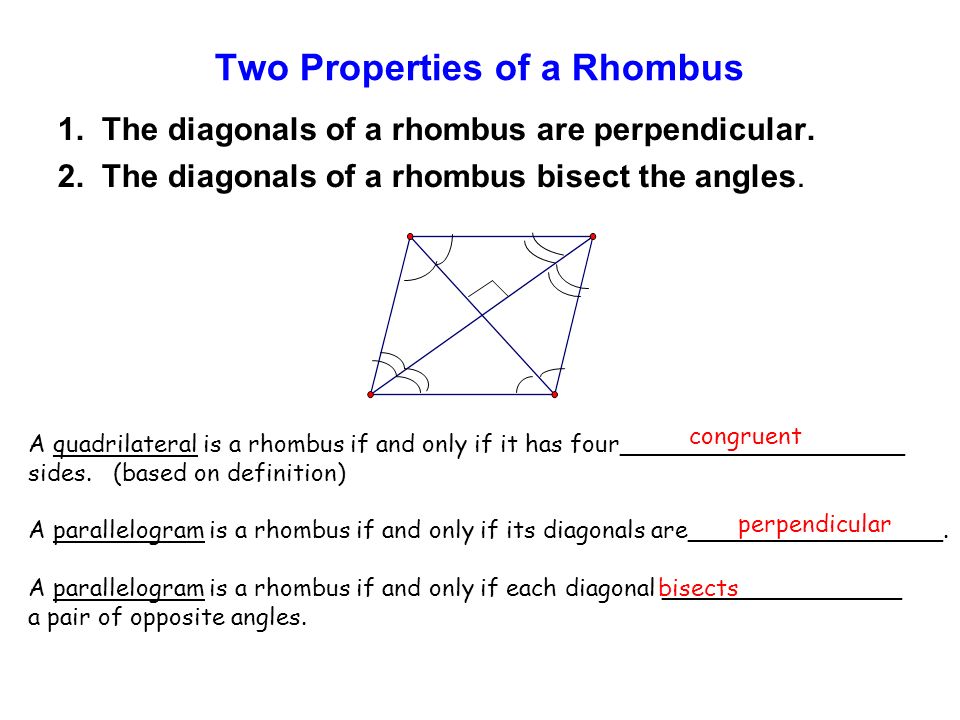
Also opposite sides are parallel and opposite angles are equal.
It is a type of parallelogram
EVALUATION/CLASSWORK
1. Define quadrilaterals
2. Mention all the quadrilaterals
3. State the features of a square, rectangle and a rhombus.
ASSIGNMENT:
Draw a square, rectangle and a rhombus.
further studies
http://www.mathsisfun.com/definitions/q ... teral.html
practice test
http://www.ixl.com/math/geometry/classi ... rilaterals
LESSON 11
MAIN TOPIC : Quadrilaterals
SPECIFIC TOPIC : Construction
REFERENCE BK : Basic technology for JSS by Evans and Nation Building Basic Technology by E.K AJAYI.
PERFORMANCE OBJECTIVES: At the end of the lesson the students should be able to:
(1)State the feature of rhomboid, trapezium and parallelogram
(2)construct the quadrilaterals
CONTENT : RHOMBOID, TRAPEZIUM, PARALLELOGRAM
Rhomboid- are parallelograms in which only the opposite angles and sides are equal.
Trapezium- Trapezium: it has only a pair of the opposite side equal.
Parallelograms- Opposite sides are parallel and equal in length, and opposite angles are equal.

Kite- : have two pairs of sides. Each pair is made up of adjacent sides that are equal in length. The angles are equal where the pairs meet.

CONSTRUCTION OF QUADRILATERALS
https://youtu.be/Pz64J1hJV8E
http://www.ask-math.com/constructing-qu ... erals.html
http://www.math-only-math.com/construct ... erals.html
PARALLELOGRAM
https://youtu.be/Jej0hVXKEvQ
http://www.scribd.com/doc/11579125/Cons ... allelogram
http://www.onlinemathlearning.com/const ... ogram.html
http://www.mathopenref.com/constparallelrhombus.html
TRAPEZIUM
https://youtu.be/IE__oqc0jaI
KITE
https://youtu.be/f6M2_H81U2Y
practice test
http://www.math-only-math.com/worksheet ... erals.html
http://mathematicsquestionbank.blogspot ... erals.html
LESSON 12
TOPIC: PRACTICE CONSTRUCTION AND BISECTION OF ANGLES
SUB-TOPICS:
1. Construction of Angle 600
2. Construction of Angle 300
3. Construction of Angle 900
4. Construction of Angle 450
5. Construction of Angle 150
6. Construction of Angle 22.50
CONSTRUCTION OF ANGLE 600
Procedure
1. Draw a line AB
2. Indicate point C anywhere on the AB
3. With centre O and any convenient radius, draw an arc to cut AB at D
4. With centre D and the same radius, draw an arc to cut the previous one at E
5. Draw a line from O through E (line OE) to F.
6. FOB is the required angle 600.
CONSTRUCTION OF ANGLE 300
Bisection of Angle 600 will give 300
To bisect a line means to divide a line into two equal parts by construction using a pair of compasses
PROCEDURE
1. Repeat steps i-vi
2. With the centre at D and E in turn, open your compass to any convenient radius. Then strike arc to intersect each other.
3. Then join the point of their intersection G to another point O
4. Angle GOB=COG=300
CONSTRUCTION OF ANGLE 900
Procedure
1. Draw a line AB.
2. Mark the line AB at C
3. With centre C and any convenient radius, draw the semicircle DE
4. With centres D and E and any convenient radius, draw arcs to intersect at F.
5. A line drawn from C through the semicircle at G to meet intersection of the arcs at F will give angle 90[0 on both sides.
CONSTRUCTION OF ANGLE 450
BISECTION OF ANGLE 900
To bisect an angle means to divide the angle into two equal parts.
Bisecting angle 900 will give angle 450.
1. Repeat steps i-v
2. With the centre at D and G in turn, open your compass to any convenient radius and strike an arc each to intersect at H.
3. Join C to H.
4. Then angle HCB=450
CONSTRUCTION OF ANGLE 150
BISECTING ANGLE 300 WILL GIVE ANGLE 150 IN TWO PARTS
Procedure
1. Draw the given angle BAC(300)
2. With center A and any convenient radius, draw an arc to cut AB at D and AC at E.
3. With center D and any radius, draw an arc.
4. With center E and the same radius, draw another arc to intersect the previous one at F.
5. Join AF to divide the angle into two parts.
CONSTRUCTION OF ANGLE 22.50
BISECTING ANGLE 450 WILL GIVE ANGLE 22.50
Procedure
1. Draw the given angle BAC (450)
2. With center A and any convenient radius, draw an arc to cut AB at D and AC at E.
3. With centre D and any radius, draw an arc.
4. With center E and the same radius, draw another arc to intersect the previous one at F
5. Join AF to divide the angle into two parts.
EVALUATION
1. What is an angle
2. Give a rough sketch of angle 900
READING ASSIGNMENT: NERDC Basic Technology for Junior Secondary School 2 Chapter 5 Pages 28
ASSIGNMENT
1. Construct angle 900
2. Bisect the angle 900 above into 450.
MAIN TOPIC : Quadrilaterals
SPECIFIC TOPIC : Definition and meaning
REFERENCE BK : Basic technology for JSS by Evans and Nation Building Basic Technology by E.K AJAYI.
PERFORMANCE OBJECTIVES: At the end of the lesson the students should be able to:
(1) Mention all the quadrilaterals
(2) State the features of each quadrilateral
QUADRILATERALS
Quadrilaterals are plane figures bounded by four straight lines. Sum of the angles of a quadrilateral is 360˚.The common quadrilaterals are:
Square.
Rectangle.
Rhombus
Parallelogram
Trapezium
https://youtu.be/yiREqzDsMP8
Square: are plane figures with four equal straight sides and equal angles of 90˚ each.
Rectangle: these are plane figures with the two opposite sides equal and all the angles 90
Rhombus
A four-sided shape where all sides have equal length.
Also opposite sides are parallel and opposite angles are equal.
It is a type of parallelogram
EVALUATION/CLASSWORK
1. Define quadrilaterals
2. Mention all the quadrilaterals
3. State the features of a square, rectangle and a rhombus.
ASSIGNMENT:
Draw a square, rectangle and a rhombus.
further studies
http://www.mathsisfun.com/definitions/q ... teral.html
practice test
http://www.ixl.com/math/geometry/classi ... rilaterals
LESSON 11
MAIN TOPIC : Quadrilaterals
SPECIFIC TOPIC : Construction
REFERENCE BK : Basic technology for JSS by Evans and Nation Building Basic Technology by E.K AJAYI.
PERFORMANCE OBJECTIVES: At the end of the lesson the students should be able to:
(1)State the feature of rhomboid, trapezium and parallelogram
(2)construct the quadrilaterals
CONTENT : RHOMBOID, TRAPEZIUM, PARALLELOGRAM
Rhomboid- are parallelograms in which only the opposite angles and sides are equal.
Trapezium- Trapezium: it has only a pair of the opposite side equal.
Parallelograms- Opposite sides are parallel and equal in length, and opposite angles are equal.
Kite- : have two pairs of sides. Each pair is made up of adjacent sides that are equal in length. The angles are equal where the pairs meet.
CONSTRUCTION OF QUADRILATERALS
https://youtu.be/Pz64J1hJV8E
http://www.ask-math.com/constructing-qu ... erals.html
http://www.math-only-math.com/construct ... erals.html
PARALLELOGRAM
https://youtu.be/Jej0hVXKEvQ
http://www.scribd.com/doc/11579125/Cons ... allelogram
http://www.onlinemathlearning.com/const ... ogram.html
http://www.mathopenref.com/constparallelrhombus.html
TRAPEZIUM
https://youtu.be/IE__oqc0jaI
KITE
https://youtu.be/f6M2_H81U2Y
practice test
http://www.math-only-math.com/worksheet ... erals.html
http://mathematicsquestionbank.blogspot ... erals.html
LESSON 12
TOPIC: PRACTICE CONSTRUCTION AND BISECTION OF ANGLES
SUB-TOPICS:
1. Construction of Angle 600
2. Construction of Angle 300
3. Construction of Angle 900
4. Construction of Angle 450
5. Construction of Angle 150
6. Construction of Angle 22.50
CONSTRUCTION OF ANGLE 600
Procedure
1. Draw a line AB
2. Indicate point C anywhere on the AB
3. With centre O and any convenient radius, draw an arc to cut AB at D
4. With centre D and the same radius, draw an arc to cut the previous one at E
5. Draw a line from O through E (line OE) to F.
6. FOB is the required angle 600.
CONSTRUCTION OF ANGLE 300
Bisection of Angle 600 will give 300
To bisect a line means to divide a line into two equal parts by construction using a pair of compasses
PROCEDURE
1. Repeat steps i-vi
2. With the centre at D and E in turn, open your compass to any convenient radius. Then strike arc to intersect each other.
3. Then join the point of their intersection G to another point O
4. Angle GOB=COG=300
CONSTRUCTION OF ANGLE 900
Procedure
1. Draw a line AB.
2. Mark the line AB at C
3. With centre C and any convenient radius, draw the semicircle DE
4. With centres D and E and any convenient radius, draw arcs to intersect at F.
5. A line drawn from C through the semicircle at G to meet intersection of the arcs at F will give angle 90[0 on both sides.
CONSTRUCTION OF ANGLE 450
BISECTION OF ANGLE 900
To bisect an angle means to divide the angle into two equal parts.
Bisecting angle 900 will give angle 450.
1. Repeat steps i-v
2. With the centre at D and G in turn, open your compass to any convenient radius and strike an arc each to intersect at H.
3. Join C to H.
4. Then angle HCB=450
CONSTRUCTION OF ANGLE 150
BISECTING ANGLE 300 WILL GIVE ANGLE 150 IN TWO PARTS
Procedure
1. Draw the given angle BAC(300)
2. With center A and any convenient radius, draw an arc to cut AB at D and AC at E.
3. With center D and any radius, draw an arc.
4. With center E and the same radius, draw another arc to intersect the previous one at F.
5. Join AF to divide the angle into two parts.
CONSTRUCTION OF ANGLE 22.50
BISECTING ANGLE 450 WILL GIVE ANGLE 22.50
Procedure
1. Draw the given angle BAC (450)
2. With center A and any convenient radius, draw an arc to cut AB at D and AC at E.
3. With centre D and any radius, draw an arc.
4. With center E and the same radius, draw another arc to intersect the previous one at F
5. Join AF to divide the angle into two parts.
EVALUATION
1. What is an angle
2. Give a rough sketch of angle 900
READING ASSIGNMENT: NERDC Basic Technology for Junior Secondary School 2 Chapter 5 Pages 28
ASSIGNMENT
1. Construct angle 900
2. Bisect the angle 900 above into 450.
WEEK 4
LESSON 13
MAIN TOPIC : Polygons
SPECIFIC TOPIC : Meaning of Polygon
REFERENCE BK :Basic technology for JSS by Evans and Nation Building Basic Technology2 By E.K AJAYI.
PERFORMANCE OBJECTIVES: At the end of the lesson the students should be able to:
(1) define Polygon
(2) mention different examples of Polygons
CONTENT
POLYGONS are plane figures with four or more sides. Regular polygons have equal sides and angles. The common Polygons are:
1. Pentagon ----5 sides
2. Hexagon----6Sides
3. Heptagon---7sides
4. Octagon ----8sides
5. Nonagon---9sides
6. Decagon---10sides.
https://youtu.be/IaoZhhx_I9s
PENTAGON
HEXAGON
Irregular polygons are polygons with the required sizes but the length are not equal.
EVALUATION/CLASSWORK
Define polygon
Mention the polygons with their sizes
ASSIGNMENT: Draw all the polygon
further studies
http://www.mathsisfun.com/geometry/polygons.html
http://www.mathsteacher.com.au/year7/ch ... on/pol.htm
http://www.basic-mathematics.com/types-of-polygons.html
http://www.mathsisfun.com/geometry/regu ... ygons.html
practice test
http://www.ixl.com/math/grade-7/interio ... f-polygons
LESSON 14
MAIN TOPIC : Polygon
SPECIFIC TOPIC : Construction of polygon
REFERENCE BOOK : Basic Technology for JSS by Evans and Nation Building Basic Technology by E.K AJAYI.
PERFORMANCE OBJECTIVES: At the end of the lesson the students should be able to:
(1) Construct a Pentagon
(2) Construct a Hexagon
CONTENT: CONSTRUCTION OF POLYGON
Class Work - Construct a regular pentagon of 50mm sides
STEPS 1 : Divide 360 by the number of side N . Therefore the external angle 360˚/5=72˚
STEP 2 : Draw one side AB and a construction line 72˚to AB from A and B .
STEP 3 : Construct ABCED
CONSTRUCT HEXAGON
STEP 1: Draw the circle of radius equal to the length of the given side.
STEP 2: Draw horizontal diameter AB. With centre A AND B, C, D, E and F.
STEP 3: Join all the points to complete the hexagon.
EVALUATION/CLASSWORK
Draw each of the shapes on your own.
further studies
http://www.ac-noumea.nc/maths/polyhedr/polyg_draw_.htm
practice test
http://www.softschools.com/quizzes/math ... z1056.html
http://www.math.com/school/subject3/S3U2Quiz.html
http://www.aaamath.com/g318_px1.htm#section2
LESSON 15
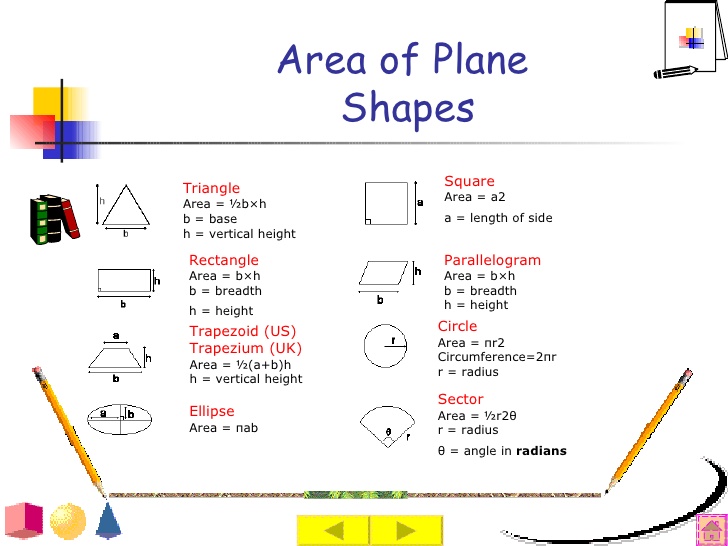
MAIN TOPIC : Area of plane figures
SPECIFIC TOPIC : Area
REFERENCE BK :Basic technology for JSS by Evans and Nation Building Basic Technology by E.K AJAYI.
PERFORMANCE OBJECTIVES: At the end of the lesson the students should be able to:
i. define area
ii. construct the area of the triangle
CONTENT
The area of a plane figure can be defined as the space occupied by that figure. It is usually the product of lengths and so the unit are always in the square of linear measurement units e.g. CM sq M sq .The procedure for finding the areas of common.
https://youtu.be/xCdxURXMdFY
CLASSWORK
A triangle ABC has an area 15cm sq and a base length 5cm sq. Construct the triangle
EVALUATION/CLASSWORK
1. Define area
2. Construct the area of a triangle
further studies
http://www.mathsteacher.com.au/year8/ch12_area/fig.htm
http://recursostic.educacion.es/descart ... /index.htm
http://www.bymath.com/studyguide/geo/sec/geo12.htm
LESSON 16
MAIN TOPIC : Area of plane figures
SPECIFIC TOPIC : Enlargement of plane figures
REFERENCE BK : Basic technology for JSS by Evans and Nation Building Basic Technology by E.K AJAYI.
PERFORMANCE OBJECTIVES: At the end of the lesson the students should be able to:
i. construct a shape and enlarge it according to a given ratio
ii. construct a shape and reduce it according to a given ratio
CONTENT : Enlargement of shapes
Example1.To construct a figure similar to a given ABCEDF with its sides in the ratio of 6:4
Procedures
1. Draw the given figure ABCDEF
2. Project lines from A to C D E and F
3. Draw an incline line at any convenient angle but less than 90˚ to AB and mark 6 equal division on it.
4. Join the sixth division to B and the fourth division parallel to it meeting AB at B.
5. Draw B1C1,C1D1 ,D1E1 and E1F1 parallel to BC, CD, DE and EF to complete the enlarged figure.

EVALUATION/CLASSWORK
The teacher evaluates the lesson by asking students to carry out a specific construction exercise.
practice test
http://www.ixl.com/math/geometry/perimeter
http://www.ixl.com/math/geometry/area-o ... -triangles
http://www.ixl.com/math/geometry/area-of-trapezoids
http://www.ixl.com/math/geometry/area-a ... ar-figures
http://www.mathsisfun.com/area.html
watch video
https://youtu.be/4nyWd8DdUk0
MAIN TOPIC : Polygons
SPECIFIC TOPIC : Meaning of Polygon
REFERENCE BK :Basic technology for JSS by Evans and Nation Building Basic Technology2 By E.K AJAYI.
PERFORMANCE OBJECTIVES: At the end of the lesson the students should be able to:
(1) define Polygon
(2) mention different examples of Polygons
CONTENT
POLYGONS are plane figures with four or more sides. Regular polygons have equal sides and angles. The common Polygons are:
1. Pentagon ----5 sides
2. Hexagon----6Sides
3. Heptagon---7sides
4. Octagon ----8sides
5. Nonagon---9sides
6. Decagon---10sides.
https://youtu.be/IaoZhhx_I9s
PENTAGON
HEXAGON
Irregular polygons are polygons with the required sizes but the length are not equal.
EVALUATION/CLASSWORK
Define polygon
Mention the polygons with their sizes
ASSIGNMENT: Draw all the polygon
further studies
http://www.mathsisfun.com/geometry/polygons.html
http://www.mathsteacher.com.au/year7/ch ... on/pol.htm
http://www.basic-mathematics.com/types-of-polygons.html
http://www.mathsisfun.com/geometry/regu ... ygons.html
practice test
http://www.ixl.com/math/grade-7/interio ... f-polygons
LESSON 14
MAIN TOPIC : Polygon
SPECIFIC TOPIC : Construction of polygon
REFERENCE BOOK : Basic Technology for JSS by Evans and Nation Building Basic Technology by E.K AJAYI.
PERFORMANCE OBJECTIVES: At the end of the lesson the students should be able to:
(1) Construct a Pentagon
(2) Construct a Hexagon
CONTENT: CONSTRUCTION OF POLYGON
Class Work - Construct a regular pentagon of 50mm sides
STEPS 1 : Divide 360 by the number of side N . Therefore the external angle 360˚/5=72˚
STEP 2 : Draw one side AB and a construction line 72˚to AB from A and B .
STEP 3 : Construct ABCED
CONSTRUCT HEXAGON
STEP 1: Draw the circle of radius equal to the length of the given side.
STEP 2: Draw horizontal diameter AB. With centre A AND B, C, D, E and F.
STEP 3: Join all the points to complete the hexagon.
EVALUATION/CLASSWORK
Draw each of the shapes on your own.
further studies
http://www.ac-noumea.nc/maths/polyhedr/polyg_draw_.htm
practice test
http://www.softschools.com/quizzes/math ... z1056.html
http://www.math.com/school/subject3/S3U2Quiz.html
http://www.aaamath.com/g318_px1.htm#section2
LESSON 15
MAIN TOPIC : Area of plane figures
SPECIFIC TOPIC : Area
REFERENCE BK :Basic technology for JSS by Evans and Nation Building Basic Technology by E.K AJAYI.
PERFORMANCE OBJECTIVES: At the end of the lesson the students should be able to:
i. define area
ii. construct the area of the triangle
CONTENT
The area of a plane figure can be defined as the space occupied by that figure. It is usually the product of lengths and so the unit are always in the square of linear measurement units e.g. CM sq M sq .The procedure for finding the areas of common.
https://youtu.be/xCdxURXMdFY
CLASSWORK
A triangle ABC has an area 15cm sq and a base length 5cm sq. Construct the triangle
EVALUATION/CLASSWORK
1. Define area
2. Construct the area of a triangle
further studies
http://www.mathsteacher.com.au/year8/ch12_area/fig.htm
http://recursostic.educacion.es/descart ... /index.htm
http://www.bymath.com/studyguide/geo/sec/geo12.htm
LESSON 16
MAIN TOPIC : Area of plane figures
SPECIFIC TOPIC : Enlargement of plane figures
REFERENCE BK : Basic technology for JSS by Evans and Nation Building Basic Technology by E.K AJAYI.
PERFORMANCE OBJECTIVES: At the end of the lesson the students should be able to:
i. construct a shape and enlarge it according to a given ratio
ii. construct a shape and reduce it according to a given ratio
CONTENT : Enlargement of shapes
Example1.To construct a figure similar to a given ABCEDF with its sides in the ratio of 6:4
Procedures
1. Draw the given figure ABCDEF
2. Project lines from A to C D E and F
3. Draw an incline line at any convenient angle but less than 90˚ to AB and mark 6 equal division on it.
4. Join the sixth division to B and the fourth division parallel to it meeting AB at B.
5. Draw B1C1,C1D1 ,D1E1 and E1F1 parallel to BC, CD, DE and EF to complete the enlarged figure.
EVALUATION/CLASSWORK
The teacher evaluates the lesson by asking students to carry out a specific construction exercise.
practice test
http://www.ixl.com/math/geometry/perimeter
http://www.ixl.com/math/geometry/area-o ... -triangles
http://www.ixl.com/math/geometry/area-of-trapezoids
http://www.ixl.com/math/geometry/area-a ... ar-figures
http://www.mathsisfun.com/area.html
watch video
https://youtu.be/4nyWd8DdUk0
WEEK 5
LESSON 17
TOPIC: CIRCLES
SUB-TOPICS:
1. Circle and its parts
2. Division of a Circle into equal parts
Circle and its parts
A Circle is a plane figure bounded by a curved line called the circumference.
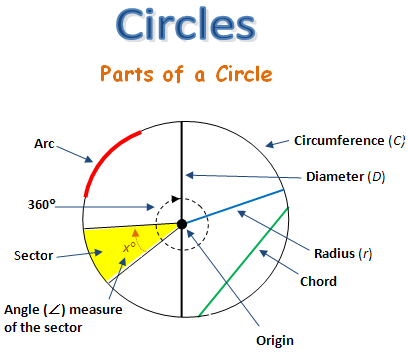
Parts of a Circle
The following are the various parts of a circle:
1. Diameter: The diameter is a straight line drawn through the center of a circle and meeting the circumference at both ends.
2. Radius: The radius is a straight line drawn from the center of a circle to any point on the circumference of the circle. A radius is always half of the circle’s diameter.
3. Segment: This is an area of the circle bounded by an arc and a chord
4. Chord: The chord is a straight line which joins any two given points on the circumference of a circle.
5. Sector: This is the part of a circle bounded by two radii and an arc.
6. Quadrant: The quadrant is the part of a circle bounded by two radii which are at right angles to each other, and bounded by an arc. A quadrant is a quarter of the circle.
7. Tangent: The tangent is usually formed outside the circle. When a straight line touches the circumference of the circle, a tangent is formed. However, that line must be at right angle to a radius.
https://youtu.be/cC0fZ_lkFpQ
https://youtu.be/O-cawByg2aA
Evaluation
Describe 5 parts of a circle
LESSON 18
Division of a Circle into Equal Parts
For dividing a circle into equal parts; the setsquare, tee-square or pair of compasses can be used.
Dividing A Circle into four Equal Parts
Steps
1. Draw the given circle with Center O
2. Draw a diameter AOB
3. Draw another diameter COD perpendicular to AOB
4. Lines AOB and COD divide the circle into four equal parts
Dividing a Circle into Eight Equal Parts
Steps
1. Draw the given circle with center O
2. Divide the circle into four equal parts
3. Using a pair of compasses, bisect angles AOC and COB and project the lines to meet the circle at both ends at points D, E, F and G
Dividing a Circle into Six Equal Parts
Steps
1. Draw the given circle with center O
2. Using a pair of compasses, take the radius of the circle and step it off six times on the circumference at points ABCDEF
Dividing a Circle into Twelve Equal Parts
Steps
1. Draw a given circle with center O
2. Divide the circle into six equal parts
3. Using a pair of compasses, bisect angles AOF, FOE and EOD and project the lines to meet the circle at both ends
https://youtu.be/ypPhumJTnXQ
https://youtu.be/eaKOyI9Srxc
Evaluation
Divide a circle of radius 8cm into eight equal parts
Reading Assignment
NERDC Basic Technology for Junior Secondary School 2 Chapter 6 Pages 40 – 46
Assignment
1. Draw a circle and identify its various parts
2. Divide a circle of diameter 12cm into 12 equal parts
LESSON 19
SUB-TOPICS:
1. Tangent and Normal to a circle
2. Construction of Tangent and Normal to a circle
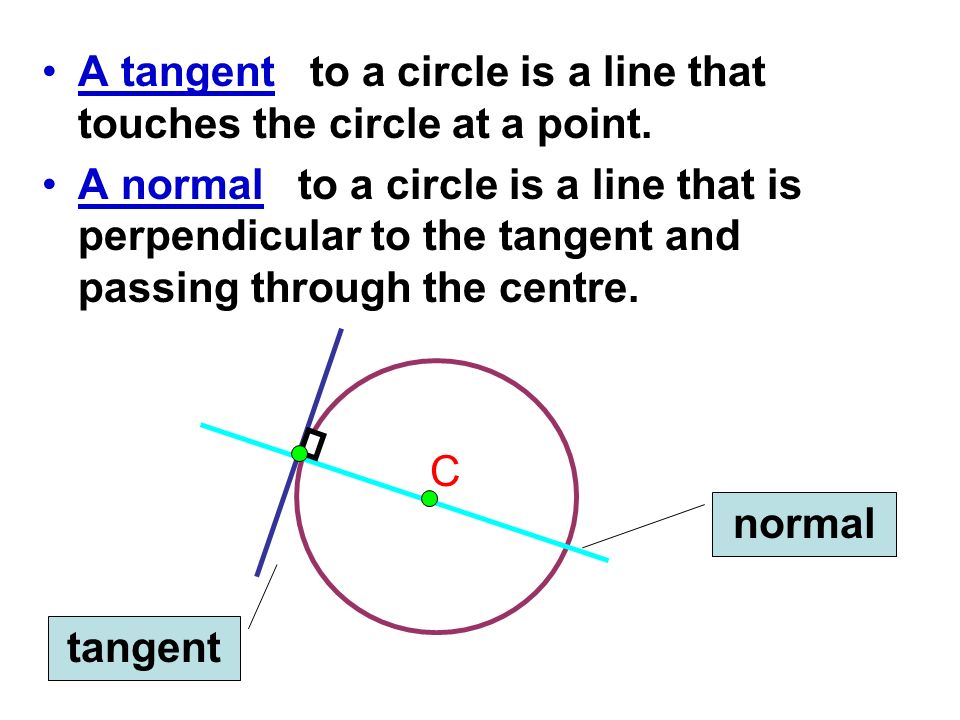
Tangent and Normal to a Circle
A tangent is a straight line that touches the circumference of a circle. It is usually at right angles to the radius of the circle.
A normal is a straight line which joins the center of a circle to the tangent at the point of tangency.
Construction of Tangent and Normal to a circle
1. Tangent to a circle from a point on the circumference
Steps
1. Draw the circle with center O
2. Mark the given point A on the circumference
3. Join OA and extends it outwards
4. With A as center and radius OA, draw an arc to cut the extended line at B
5. The perpendicular bisector of OB is the required tangent
6. CD is the tangent to the circle at point A while OB is the normal
https://youtu.be/7PdAkCaeI2s
7. Tangent to a circle from a given point outside the circle
Steps
1. Draw the given circle with center O
2. Locate point A outside the circle
3. Draw line OA
4. Construct a semicircle on OA to intersect the given circle at B
5. Line AB is the required tangent to the circle
https://youtu.be/YtGK1cA4EGI
6. Tangent to two Equal Circles
Steps
1. Draw the two circles with centers A and B respectively
2. Draw line AB to join the two centers
3. Draw a line perpendicular to AB at A to intersect the first circle at D
4. Draw a line perpendicular to AB at B to intersect the second circle at C
5. CD is the required tangent
https://youtu.be/GSFya28c3d8
Evaluation
1. Draw a circle indicating its tangent and normal to the tangent
2. Construct a tangent to a circle of radius 4cm at any point on the circumference. Indicate also the normal
3. Construct a tangent to a circle of diameter 10cm at any point of your choice outside the circle. Indicate also the normal
Reading Assignment
NERDC Basic Technology for Junior Secondary School 2 Chapter 6 Pages 40 – 46
Assignment
Construct the tangent to two circles, each of diameter 5cm, indicating the normals
TOPIC: CIRCLES
SUB-TOPICS:
1. Circle and its parts
2. Division of a Circle into equal parts
Circle and its parts
A Circle is a plane figure bounded by a curved line called the circumference.
Parts of a Circle
The following are the various parts of a circle:
1. Diameter: The diameter is a straight line drawn through the center of a circle and meeting the circumference at both ends.
2. Radius: The radius is a straight line drawn from the center of a circle to any point on the circumference of the circle. A radius is always half of the circle’s diameter.
3. Segment: This is an area of the circle bounded by an arc and a chord
4. Chord: The chord is a straight line which joins any two given points on the circumference of a circle.
5. Sector: This is the part of a circle bounded by two radii and an arc.
6. Quadrant: The quadrant is the part of a circle bounded by two radii which are at right angles to each other, and bounded by an arc. A quadrant is a quarter of the circle.
7. Tangent: The tangent is usually formed outside the circle. When a straight line touches the circumference of the circle, a tangent is formed. However, that line must be at right angle to a radius.
https://youtu.be/cC0fZ_lkFpQ
https://youtu.be/O-cawByg2aA
Evaluation
Describe 5 parts of a circle
LESSON 18
Division of a Circle into Equal Parts
For dividing a circle into equal parts; the setsquare, tee-square or pair of compasses can be used.
Dividing A Circle into four Equal Parts
Steps
1. Draw the given circle with Center O
2. Draw a diameter AOB
3. Draw another diameter COD perpendicular to AOB
4. Lines AOB and COD divide the circle into four equal parts
Dividing a Circle into Eight Equal Parts
Steps
1. Draw the given circle with center O
2. Divide the circle into four equal parts
3. Using a pair of compasses, bisect angles AOC and COB and project the lines to meet the circle at both ends at points D, E, F and G
Dividing a Circle into Six Equal Parts
Steps
1. Draw the given circle with center O
2. Using a pair of compasses, take the radius of the circle and step it off six times on the circumference at points ABCDEF
Dividing a Circle into Twelve Equal Parts
Steps
1. Draw a given circle with center O
2. Divide the circle into six equal parts
3. Using a pair of compasses, bisect angles AOF, FOE and EOD and project the lines to meet the circle at both ends
https://youtu.be/ypPhumJTnXQ
https://youtu.be/eaKOyI9Srxc
Evaluation
Divide a circle of radius 8cm into eight equal parts
Reading Assignment
NERDC Basic Technology for Junior Secondary School 2 Chapter 6 Pages 40 – 46
Assignment
1. Draw a circle and identify its various parts
2. Divide a circle of diameter 12cm into 12 equal parts
LESSON 19
SUB-TOPICS:
1. Tangent and Normal to a circle
2. Construction of Tangent and Normal to a circle
Tangent and Normal to a Circle
A tangent is a straight line that touches the circumference of a circle. It is usually at right angles to the radius of the circle.
A normal is a straight line which joins the center of a circle to the tangent at the point of tangency.
Construction of Tangent and Normal to a circle
1. Tangent to a circle from a point on the circumference
Steps
1. Draw the circle with center O
2. Mark the given point A on the circumference
3. Join OA and extends it outwards
4. With A as center and radius OA, draw an arc to cut the extended line at B
5. The perpendicular bisector of OB is the required tangent
6. CD is the tangent to the circle at point A while OB is the normal
https://youtu.be/7PdAkCaeI2s
7. Tangent to a circle from a given point outside the circle
Steps
1. Draw the given circle with center O
2. Locate point A outside the circle
3. Draw line OA
4. Construct a semicircle on OA to intersect the given circle at B
5. Line AB is the required tangent to the circle
https://youtu.be/YtGK1cA4EGI
6. Tangent to two Equal Circles
Steps
1. Draw the two circles with centers A and B respectively
2. Draw line AB to join the two centers
3. Draw a line perpendicular to AB at A to intersect the first circle at D
4. Draw a line perpendicular to AB at B to intersect the second circle at C
5. CD is the required tangent
https://youtu.be/GSFya28c3d8
Evaluation
1. Draw a circle indicating its tangent and normal to the tangent
2. Construct a tangent to a circle of radius 4cm at any point on the circumference. Indicate also the normal
3. Construct a tangent to a circle of diameter 10cm at any point of your choice outside the circle. Indicate also the normal
Reading Assignment
NERDC Basic Technology for Junior Secondary School 2 Chapter 6 Pages 40 – 46
Assignment
Construct the tangent to two circles, each of diameter 5cm, indicating the normals
WEEK 6
LESSON 20
MAIN TOPIC : Miscellaneous Construction
SPECIFIC TOPIC : Division of lines
REFERENCE BK : Basic technology for JSS by Evans and Nation Building Basic Technology by E.K AJAYI.
PERFORMANCE OBJECTIVE: At the end of the lesson the students should be able to:
i. Divide a given line into any given equal number
ii. Divide a given line into any given ratio
CONTENT
Example .Draw a line of of 70mm and divide it into 4 equal parts
Step 1. Draw the given line AB
Step 2.Project A to C
Step 3.Divide line AC into the given number
Step 4. Project the division lines to line AB
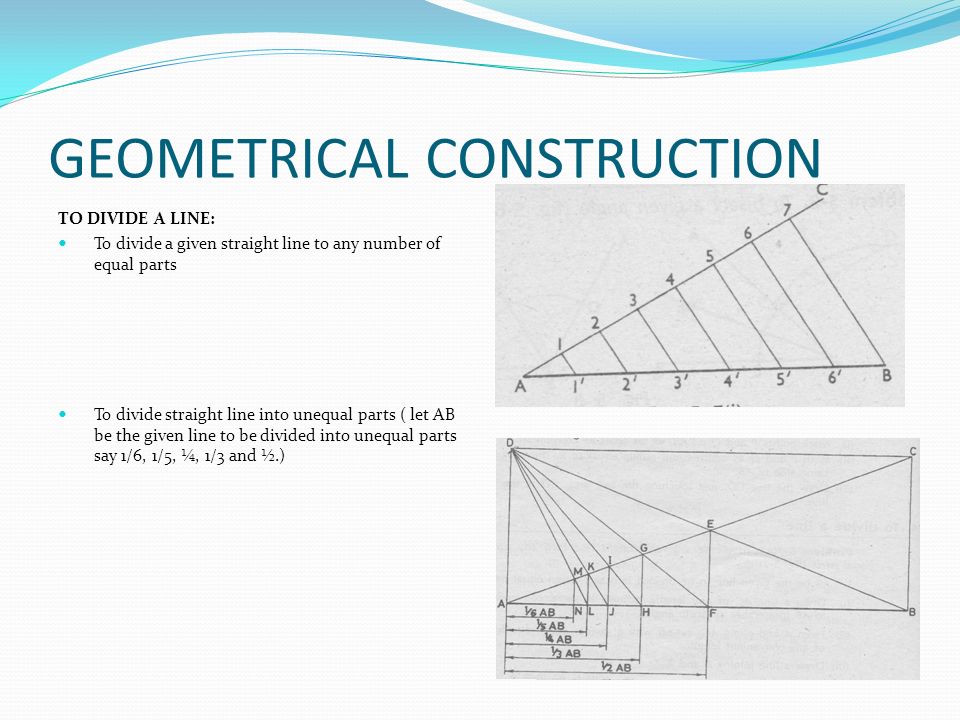
DIVISION OF LINES INTO RATIO 3:1
View Below
https://drive.google.com/file/d/1i42jXd ... sp=sharing
https://youtu.be/bozVx8PhqYY
EVALUATION/CLASSWORK
Draw a line of 86mm and divide it into 6 equal parts
Draw a line of 90mm and divide it into ratio
https://youtu.be/T1_UZUhd_cU
ASSIGNMENT: Draw a line of 105mm and divide it into
(a) 7 equal parts
(b) Ratio 2:3:4
further studies
http://www.vitutor.com/geometry/plane/line_segment.html
http://www.mathopenref.com/constdividesegment.html
LESSON 21
MAIN TOPIC : Miscellaneous Construction
SPECIFIC TOPIC : Inscribing and circumscribing of circles in a triangle
REFERENCE BK :Basic technology for JSS by Evans and Nation Building Basic Technology by E.K AJAYI.
PERFORMANCE OBJECTIVE: At the end of the lesson the students should be able to:
i. Construct an equilateral triangle
ii. Inscribe a circle in the triangle
CONTENT
Example. Construct an equilateral triangle of 60mm and inscribe a circle in it.
Step 1. Construct the given triangle
Step 2.Bisect any two angles of the triangle
Step 3. Locate centre O the intersection of your bisection lines
Step 4. From centre O and your compass extended to AB or BC draw your circle to touch the three sides of the triangle
View Below
https://drive.google.com/file/d/1i42jXd ... sp=sharing
View construction of equilateral triangle
View Inscribing a circle in a triangle
View Circumcircle
EVALUATION/CLASSWORK
Construct a triangle of 80mm
(a) Inscribe a circle in it
(b)Escribe a circle in it
further studies
http://www.mathsisfun.com/geometry/cons ... ircum.html
LESSON 22
MAIN TOPIC : Miscellaneous construction
SPECIFIC TOPIC : Locate the centre of a circle
REFERENCE BK :Basic technology for JSS by Evans and Nation Building Basic Technology by E.K AJAYI.
PERFORMANCE OBJECTIVES: At the end of the lesson the students should be able to:
i. Describe a circle
ii. State the parts of a circle
CONTENT
Circle is a plane figure bounded by a curve line called circumference, which is always equidistance from the centre.
A diameter is a straight line drawn through the center, meeting the circumference at both side.
A radius is a straight line drawn from the center to the circumference.
An arc is any part of the circumference.
A chord is any straight line drawn across the circle, meeting the circumference at both ends.
A tangent is a straight line which touches the circumference. It is always at the right angles to the radius.
A segment is part of a circle bounded by an arc and a chord.
A sector is part of a circle bounded by two radii and an arc.
A quadrant is part of a circle bounded by two radii at right and an arc.
Locate the center of a circle
EVALUATION/CLASSWORK
Describe a circle
Mention all the parts of a circle
ASSIGNMENT: draw a circle and label all its parts
further studies
http://www.makeitsolar.com/science-fair ... center.htm
http://www.instructables.com/id/How-to- ... -a-circle/
http://www.cut-the-knot.org/do_you_know/compass13.shtml
http://planetmath.org/compassandstraigh ... ivencircle
http://www.mathopenref.com/constcirclecenter2.html
MAIN TOPIC : Miscellaneous Construction
SPECIFIC TOPIC : Division of lines
REFERENCE BK : Basic technology for JSS by Evans and Nation Building Basic Technology by E.K AJAYI.
PERFORMANCE OBJECTIVE: At the end of the lesson the students should be able to:
i. Divide a given line into any given equal number
ii. Divide a given line into any given ratio
CONTENT
Example .Draw a line of of 70mm and divide it into 4 equal parts
Step 1. Draw the given line AB
Step 2.Project A to C
Step 3.Divide line AC into the given number
Step 4. Project the division lines to line AB
DIVISION OF LINES INTO RATIO 3:1
View Below
https://drive.google.com/file/d/1i42jXd ... sp=sharing
https://youtu.be/bozVx8PhqYY
EVALUATION/CLASSWORK
Draw a line of 86mm and divide it into 6 equal parts
Draw a line of 90mm and divide it into ratio
https://youtu.be/T1_UZUhd_cU
ASSIGNMENT: Draw a line of 105mm and divide it into
(a) 7 equal parts
(b) Ratio 2:3:4
further studies
http://www.vitutor.com/geometry/plane/line_segment.html
http://www.mathopenref.com/constdividesegment.html
LESSON 21
MAIN TOPIC : Miscellaneous Construction
SPECIFIC TOPIC : Inscribing and circumscribing of circles in a triangle
REFERENCE BK :Basic technology for JSS by Evans and Nation Building Basic Technology by E.K AJAYI.
PERFORMANCE OBJECTIVE: At the end of the lesson the students should be able to:
i. Construct an equilateral triangle
ii. Inscribe a circle in the triangle
CONTENT
Example. Construct an equilateral triangle of 60mm and inscribe a circle in it.
Step 1. Construct the given triangle
Step 2.Bisect any two angles of the triangle
Step 3. Locate centre O the intersection of your bisection lines
Step 4. From centre O and your compass extended to AB or BC draw your circle to touch the three sides of the triangle
View Below
https://drive.google.com/file/d/1i42jXd ... sp=sharing
View construction of equilateral triangle
View Inscribing a circle in a triangle
View Circumcircle
EVALUATION/CLASSWORK
Construct a triangle of 80mm
(a) Inscribe a circle in it
(b)Escribe a circle in it
further studies
http://www.mathsisfun.com/geometry/cons ... ircum.html
LESSON 22
MAIN TOPIC : Miscellaneous construction
SPECIFIC TOPIC : Locate the centre of a circle
REFERENCE BK :Basic technology for JSS by Evans and Nation Building Basic Technology by E.K AJAYI.
PERFORMANCE OBJECTIVES: At the end of the lesson the students should be able to:
i. Describe a circle
ii. State the parts of a circle
CONTENT
Circle is a plane figure bounded by a curve line called circumference, which is always equidistance from the centre.
A diameter is a straight line drawn through the center, meeting the circumference at both side.
A radius is a straight line drawn from the center to the circumference.
An arc is any part of the circumference.
A chord is any straight line drawn across the circle, meeting the circumference at both ends.
A tangent is a straight line which touches the circumference. It is always at the right angles to the radius.
A segment is part of a circle bounded by an arc and a chord.
A sector is part of a circle bounded by two radii and an arc.
A quadrant is part of a circle bounded by two radii at right and an arc.
Locate the center of a circle
EVALUATION/CLASSWORK
Describe a circle
Mention all the parts of a circle
ASSIGNMENT: draw a circle and label all its parts
further studies
http://www.makeitsolar.com/science-fair ... center.htm
http://www.instructables.com/id/How-to- ... -a-circle/
http://www.cut-the-knot.org/do_you_know/compass13.shtml
http://planetmath.org/compassandstraigh ... ivencircle
http://www.mathopenref.com/constcirclecenter2.html
WEEK 7
LESSON 23
MAIN TOPIC : Miscellaneous Construction
SPECIFIC TOPIC : tangents of arcs
REFERENCE BOOK : Basic technology for JSS by Evans and Nation Building Basic Technology by E.K AJAYI.
PERFORMANCE OBJECTIVES: At the end of the lesson the students should be able to:
(1) draw two lines to form a right angle and arc of a given radius tangential to them
(2) draw two lines to form an acute angle and arc of a given radius tangential to them
CONTENT
To draw an arc of a given radius tangential to two lines
Procedures
Steps 1. Draw the given two lines to meet at R
2. Mark points P and Q where the intending arc should touch
3. with centre P and radius PR arc inward. Also with centre Q and radius RQ arc inward.
4. the two arcs intersects at O, the centre of arc PQ .
5. With centre O and radius OP or OQ draw the required arc
EVALUATION/CLASSWORK
Draw a right angle and form tangent with it to join the lines
Draw an acute angle and form tangent to link the lines
further studies
http://www.slideshare.net/davehohman/9- ... and-chords
http://www.mathwarehouse.com/geometry/circle/index.php
http://www.mathwarehouse.com/geometry/c ... -chord.php
LESSON 24
MAIN TOPIC : Inscribing a circle in a triangle
SPECIFIC TOPIC : Inscribing
REFERENCE BK :Basic technology for JSS by Evans and Nation Building Basic Technology by E.K AJAYI.
PERFORMANCE OBJECTIVE: At the end of the lesson the students should be able to:
(1)construct an equilateral triangle
(2)inscribe a circle in a triangle
CONTENT
Inscribing a circle in a triangle
Procedure
Step 1. Construct the given triangle ABC
Step 2. Bisect any two angle of the triangle.
Step 3. Locate the point of intersection of the bisectors
Step 4. From the intersection O extend your compass to any of the side of the triangle and draw the circle.
View Construction
EVALUATION/CLASSWORK
Construct a triangle of 60mm and inscribe a circle in it
further studies
http://www.basic-mathematics.com/constr ... angle.html
http://en.wikibooks.org/wiki/Geometry_f ... l_triangle
http://www.mathopenref.com/constequilateral.html
http://commons.wikimedia.org/wiki/File: ... Circle.gif
http://www.mathsisfun.com/geometry/cons ... cribe.html
LESSON 25
MAIN TOPIC : Inscribing and Escribing of circle in or around a triangle
SPECIFIC TOPIC : Escribing a circle in a triangle
REFERENCE BK :Basic technology for JSS by Evans and Nation Building Basic Technology by E.K AJAYI.
PERFORMANCE OBJECTIVES: At the end of the lesson the students should be able to:
(1)construct an equilateral triangle
(2)escribe a circle around the triangle
CONTENT
Escribing a circle in a triangle
Procedures
Step 1. Construct the given triangle ABC
Step 2. Bisect any two sides of the triangle.
Step 3. Locate the point of intersection of the bisectors
Step 4. From the intersection O extend your compass to any of the side of the triangle and draw the circle.
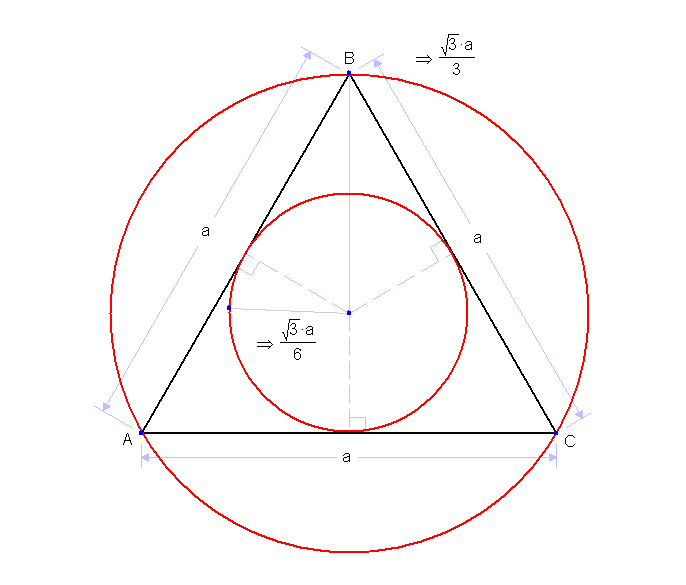
View Construction
EVALUATION/CLASSWORK
Draw a line of 50mm and escribe a circle in it
further studies
http://www.mathsisfun.com/geometry/cons ... ircum.html
MAIN TOPIC : Miscellaneous Construction
SPECIFIC TOPIC : tangents of arcs
REFERENCE BOOK : Basic technology for JSS by Evans and Nation Building Basic Technology by E.K AJAYI.
PERFORMANCE OBJECTIVES: At the end of the lesson the students should be able to:
(1) draw two lines to form a right angle and arc of a given radius tangential to them
(2) draw two lines to form an acute angle and arc of a given radius tangential to them
CONTENT
To draw an arc of a given radius tangential to two lines
Procedures
Steps 1. Draw the given two lines to meet at R
2. Mark points P and Q where the intending arc should touch
3. with centre P and radius PR arc inward. Also with centre Q and radius RQ arc inward.
4. the two arcs intersects at O, the centre of arc PQ .
5. With centre O and radius OP or OQ draw the required arc
EVALUATION/CLASSWORK
Draw a right angle and form tangent with it to join the lines
Draw an acute angle and form tangent to link the lines
further studies
http://www.slideshare.net/davehohman/9- ... and-chords
http://www.mathwarehouse.com/geometry/circle/index.php
http://www.mathwarehouse.com/geometry/c ... -chord.php
LESSON 24
MAIN TOPIC : Inscribing a circle in a triangle
SPECIFIC TOPIC : Inscribing
REFERENCE BK :Basic technology for JSS by Evans and Nation Building Basic Technology by E.K AJAYI.
PERFORMANCE OBJECTIVE: At the end of the lesson the students should be able to:
(1)construct an equilateral triangle
(2)inscribe a circle in a triangle
CONTENT
Inscribing a circle in a triangle
Procedure
Step 1. Construct the given triangle ABC
Step 2. Bisect any two angle of the triangle.
Step 3. Locate the point of intersection of the bisectors
Step 4. From the intersection O extend your compass to any of the side of the triangle and draw the circle.
View Construction
EVALUATION/CLASSWORK
Construct a triangle of 60mm and inscribe a circle in it
further studies
http://www.basic-mathematics.com/constr ... angle.html
http://en.wikibooks.org/wiki/Geometry_f ... l_triangle
http://www.mathopenref.com/constequilateral.html
http://commons.wikimedia.org/wiki/File: ... Circle.gif
http://www.mathsisfun.com/geometry/cons ... cribe.html
LESSON 25
MAIN TOPIC : Inscribing and Escribing of circle in or around a triangle
SPECIFIC TOPIC : Escribing a circle in a triangle
REFERENCE BK :Basic technology for JSS by Evans and Nation Building Basic Technology by E.K AJAYI.
PERFORMANCE OBJECTIVES: At the end of the lesson the students should be able to:
(1)construct an equilateral triangle
(2)escribe a circle around the triangle
CONTENT
Escribing a circle in a triangle
Procedures
Step 1. Construct the given triangle ABC
Step 2. Bisect any two sides of the triangle.
Step 3. Locate the point of intersection of the bisectors
Step 4. From the intersection O extend your compass to any of the side of the triangle and draw the circle.
View Construction
EVALUATION/CLASSWORK
Draw a line of 50mm and escribe a circle in it
further studies
http://www.mathsisfun.com/geometry/cons ... ircum.html
WEEK 8
LESSON 26
TOPIC: PLANE FIGURES
SUB-TOPICS:
1. Construction of areas of regular plane figures
2. Construction of Plane figures of equal areas
Construction of areas of regular plane figures
The area of a plane figure is the space occupied by that figure. Area is usually the product of two lengths and its unit is given in cm2 or m2. The areas of plane figures (also known as polygons) can be obtained through the following methods:
a) Triangles: The area of a triangle is one-half the product of base and height.
b) Parallelogram: The area of a parallelogram is the product of one side and the perpendicular distance between that side and the opposite side.
c) Quadrilateral: A quadrilateral is the combination of two triangles. The areas of the two component triangles are found and added to give the area of the quadrilateral.
d) Square or Rectangle: The area of a square or a rectangle is defined as the product of length and breadth.
e) Trapezium: The area of a trapezium is one-half the product of the sum of parallel sides and the distance between them.
f) Regular polygon: The area of a regular polygon is found by joining the vertices of the polygon to the centre so as to form several triangles. The area of the regular polygon is equal to the area of one of the triangles multiplied by the number of sides.
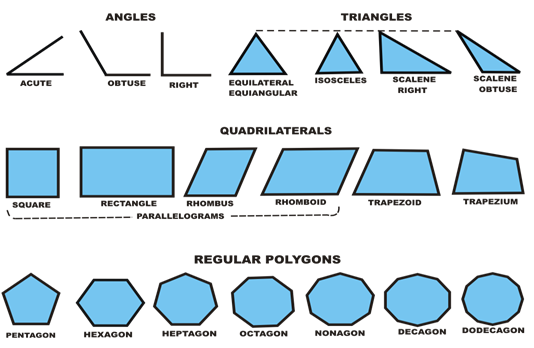
https://youtu.be/Pz64J1hJV8E
Evaluation
Discuss the areas of four regular figures
LESSON 27
Construction of Plane figures of equal areas
A. Construction of a triangle equal in area to a rectangle
Procedure
1. draw the rectangle ABCD
2. project line CD and mark off DE, using the distant equal to CD
3. draw a horizontal line from point F to line BA parallel to BC
4. locate point G anywhere on line EF
5. join point G to B and C respectively, to obtain the triangle equal in area to rectangle ABCD. Triangle BCG is equal to the given rectangle
https://youtu.be/RPYRH4D_x6M
https://youtu.be/Yl8wM40Q2Mo
A triangle equal in area to a given rectangle
B. Construction of a Square equal in area to a Rectangle
Procedure
1. draw the rectangle ABCD
2. produce AD to E such that DE equals CD
3. construct a semi-circle with AE as diameter
4. produce CD to meet the semi-circle at F
5. Construct square DFGH starting with DF. Square DFGH is the required square which is equal in area to rectangle ABCD
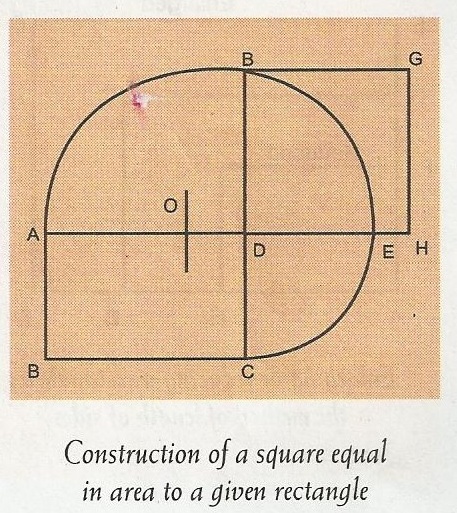
https://youtu.be/DJYKbsnBwno
C. Construction of a triangle equal in area to a given quadrilateral
Procedure is as follow
1. Draw the given quadrilateral ABCD
2. Join AC
3. From D, construct line DE parallel to AC
4. Produce BC to meet DE at F
5. Join AF
6. ABF is the required triangle equal in area to ABCD. It can be proved from simple geometry that triangle ABF is equal in area to quadrilateral ABCD
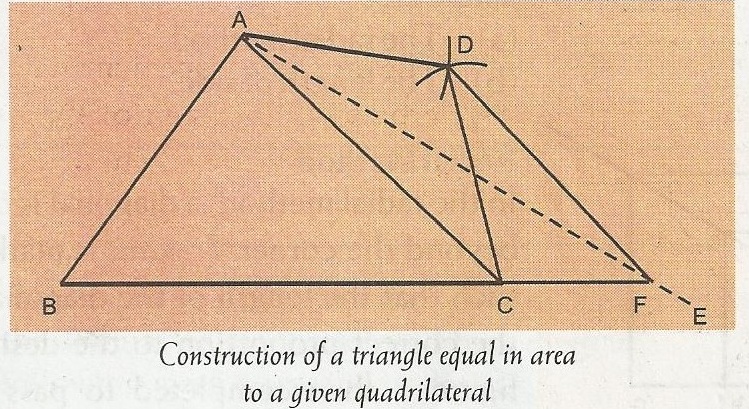
https://youtu.be/RPYRH4D_x6M
D. Construction of a rectangle equal in area to a given triangle
Procedure
1. Draw the given triangle ABC
2. Draw a line through A, parallel to BC
3. Bisect line BC perpendicularly at D and to meet the line through A at E
4. Draw a perpendicularly to BC at B to meet the line through A at F
5. FBDE is the rectangle required.
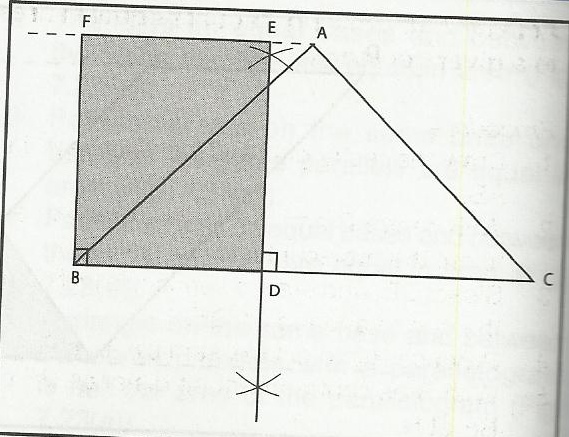
A rectangle equal in area to a given triangle
https://youtu.be/78ANuPQl1-0
Evaluation
1. Draw a triangle equal in area to a square with 5cm sides
2. Draw a rectangle 7cm long and 4 cm wide. Construct a square equal in area to the rectangle
3. A square has a side 45mm long. Construct a rectangle equal in area to the square and one of whose sides is 60 mm in length.
Reading Assignment:
NERDC Basic Technology for Junior Secondary Schools 2 chapter 7 page 61- 67
Assignment
1. Draw a rectangle 7cm long and 4cm wide. Construct a square equal in area to the rectangle.
2. Draw a triangle with sides 7cm, 5cm and 8cm. construct a square equal in area to the triangle
3. Draw a rectangle 8cm long 5cm wide. Construct another rectangle whose area is four times that of the given rectangle.
4. Draw two lines AB and BC to intersect at an angle 480. Without using a protractor, transfer the angle to another point.
5. Construct a parallelogram of equal area to a rectangle 8 cm long and 6cm wide.
LESSON 28
TOPIC: ENLARGEMENT AND REDUCTION OF PLANE FIGURES
SUB-TOPICS:
1. Enlargement/Reduction of plane figures
2. The Radial Method and Method of Length of Side
Enlargement/Reduction of plane figures
An object is enlarged when all of its dimensions are changed in the same ratio. Thus, enlargement is also called transformation. Each length of the objects is multiplied by the same number called scale factor to obtain the enlargement.
When the scale factor is less than one, the original objects is reduced.
I.e. Scale Factor = length of enlargement/corresponding length.
Examples of enlargement/reduction of plane shapes include:
ENLARGEMENT
i) Drawing a triangle which is twice the size of the original triangle
Procedure;
1. Draw the given triangle ABC
2. Draw DB perpendicularly to AB, such that BD=AB
3. With center A, and radius AD, draw an arc to meet AB at E
4. From E, draw EF parallel to BC, with F on line AC
5. Draw lines to join AEF to give the triangle double in size
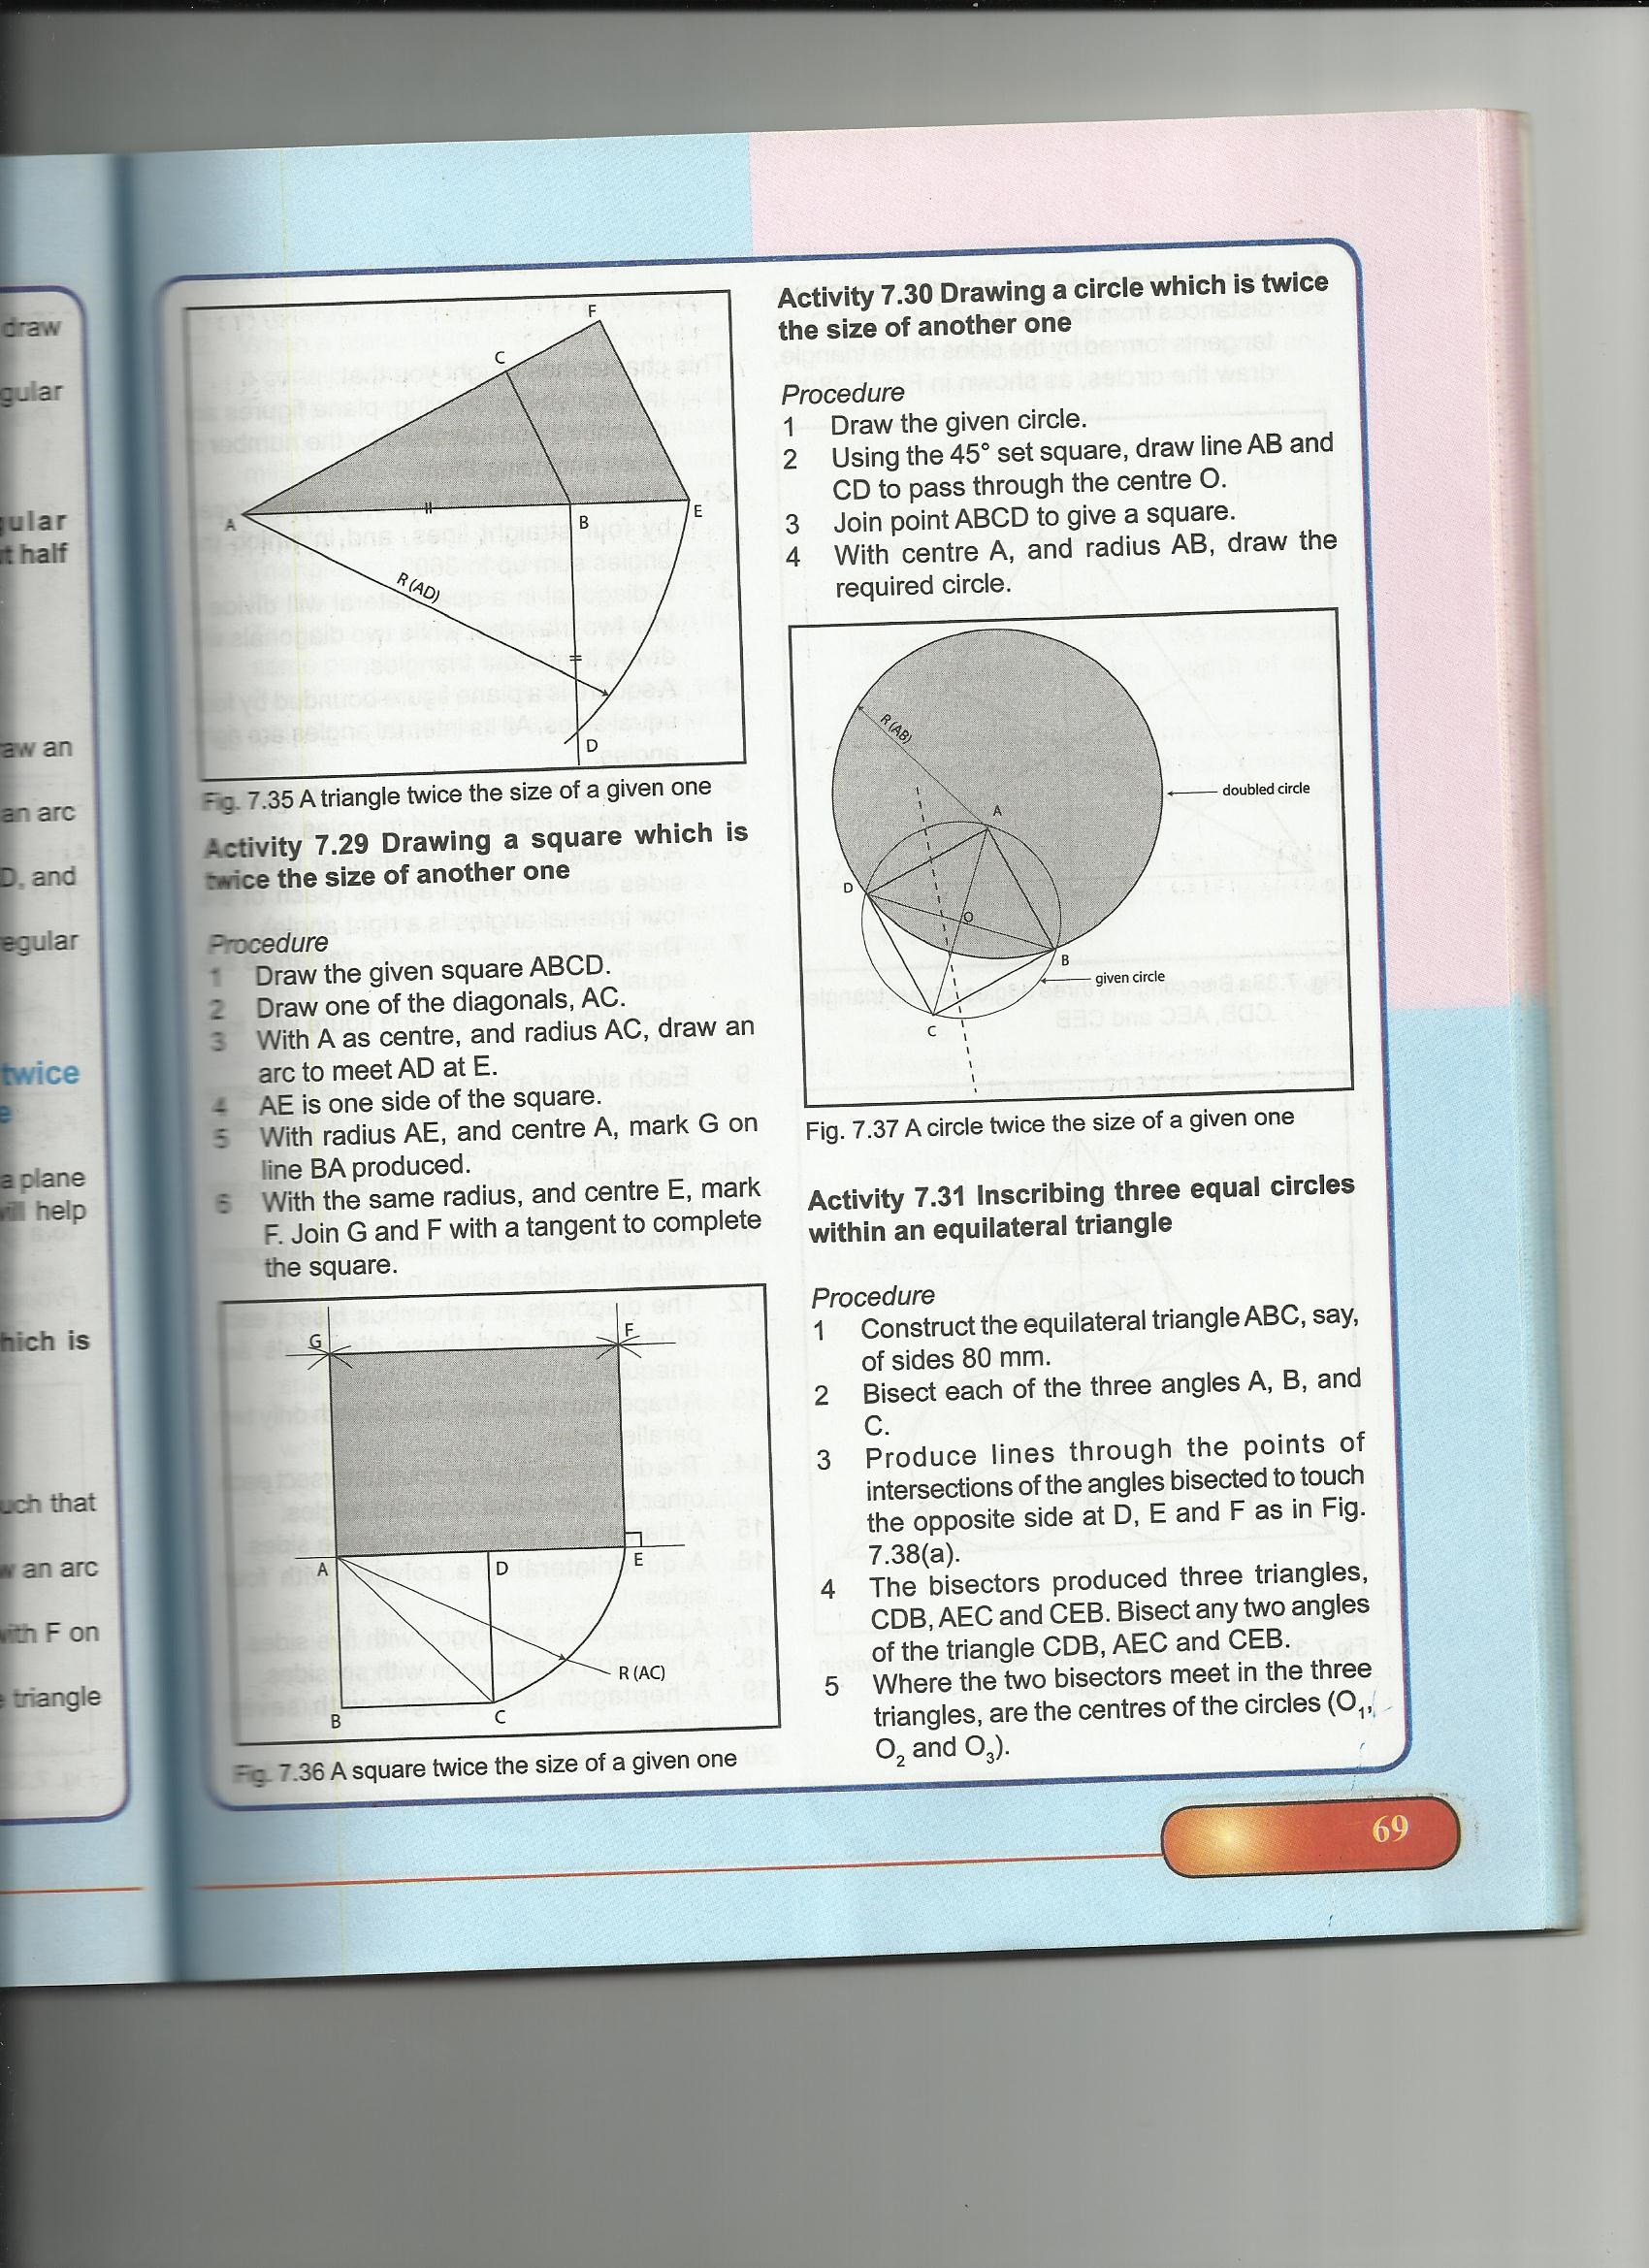
https://youtu.be/PuHE6a3V7Dw
ii) Drawing a square which is twice the size of the original square
Procedure;
1. Draw the given square ABCD
2. Draw one of the diagonals, AC.
3. With A as center, and radius AC, draw an arc to meet AD at E.
4. AE is one side of the square.
5. With radius AE, and center A, mark G on line BA produced
6. With the same radius, and center E, mark F. join G and F with a tangent to complete the square.

REDUCTION
Reducing a Plane Figure to half its area
Procedure
1. Draw the given square ABCD
2. Draw the diagonal AC and BD to intersect at O.
3. With center C and radius CO, draw an arc which meets CD at E. CE is the length of one side
4. With radius CE and center E, strike an arc above CD at F.
5. With radius CE and center C, strike another arc above line CD and G.
6. Join EF, FG and GC to obtain the square CEFG half the size of the original.
Evaluation
1. Define enlargement of a plane figure
2. What is a scale factor
3. Draw a triangle and a square of your choice which are four times the size of the original triangle and square
4. Reduce a square of your choice to one-quarter of its original size
LESSON 29
The Radial Method and Method of Length of Side
Enlargement and reduction of plane shapes can be done in two ways;
1. The radial method
2. The length of side
1. THE RADIAL METHOD
Procedure
1. Draw the rectangle ABCD
2. Join AC and produce it to E
3. Mark a point F and AE such that the ratio AC: AF is the correct ratio of the enlargement or reduction.
4. Complete the rectangle AGFH.
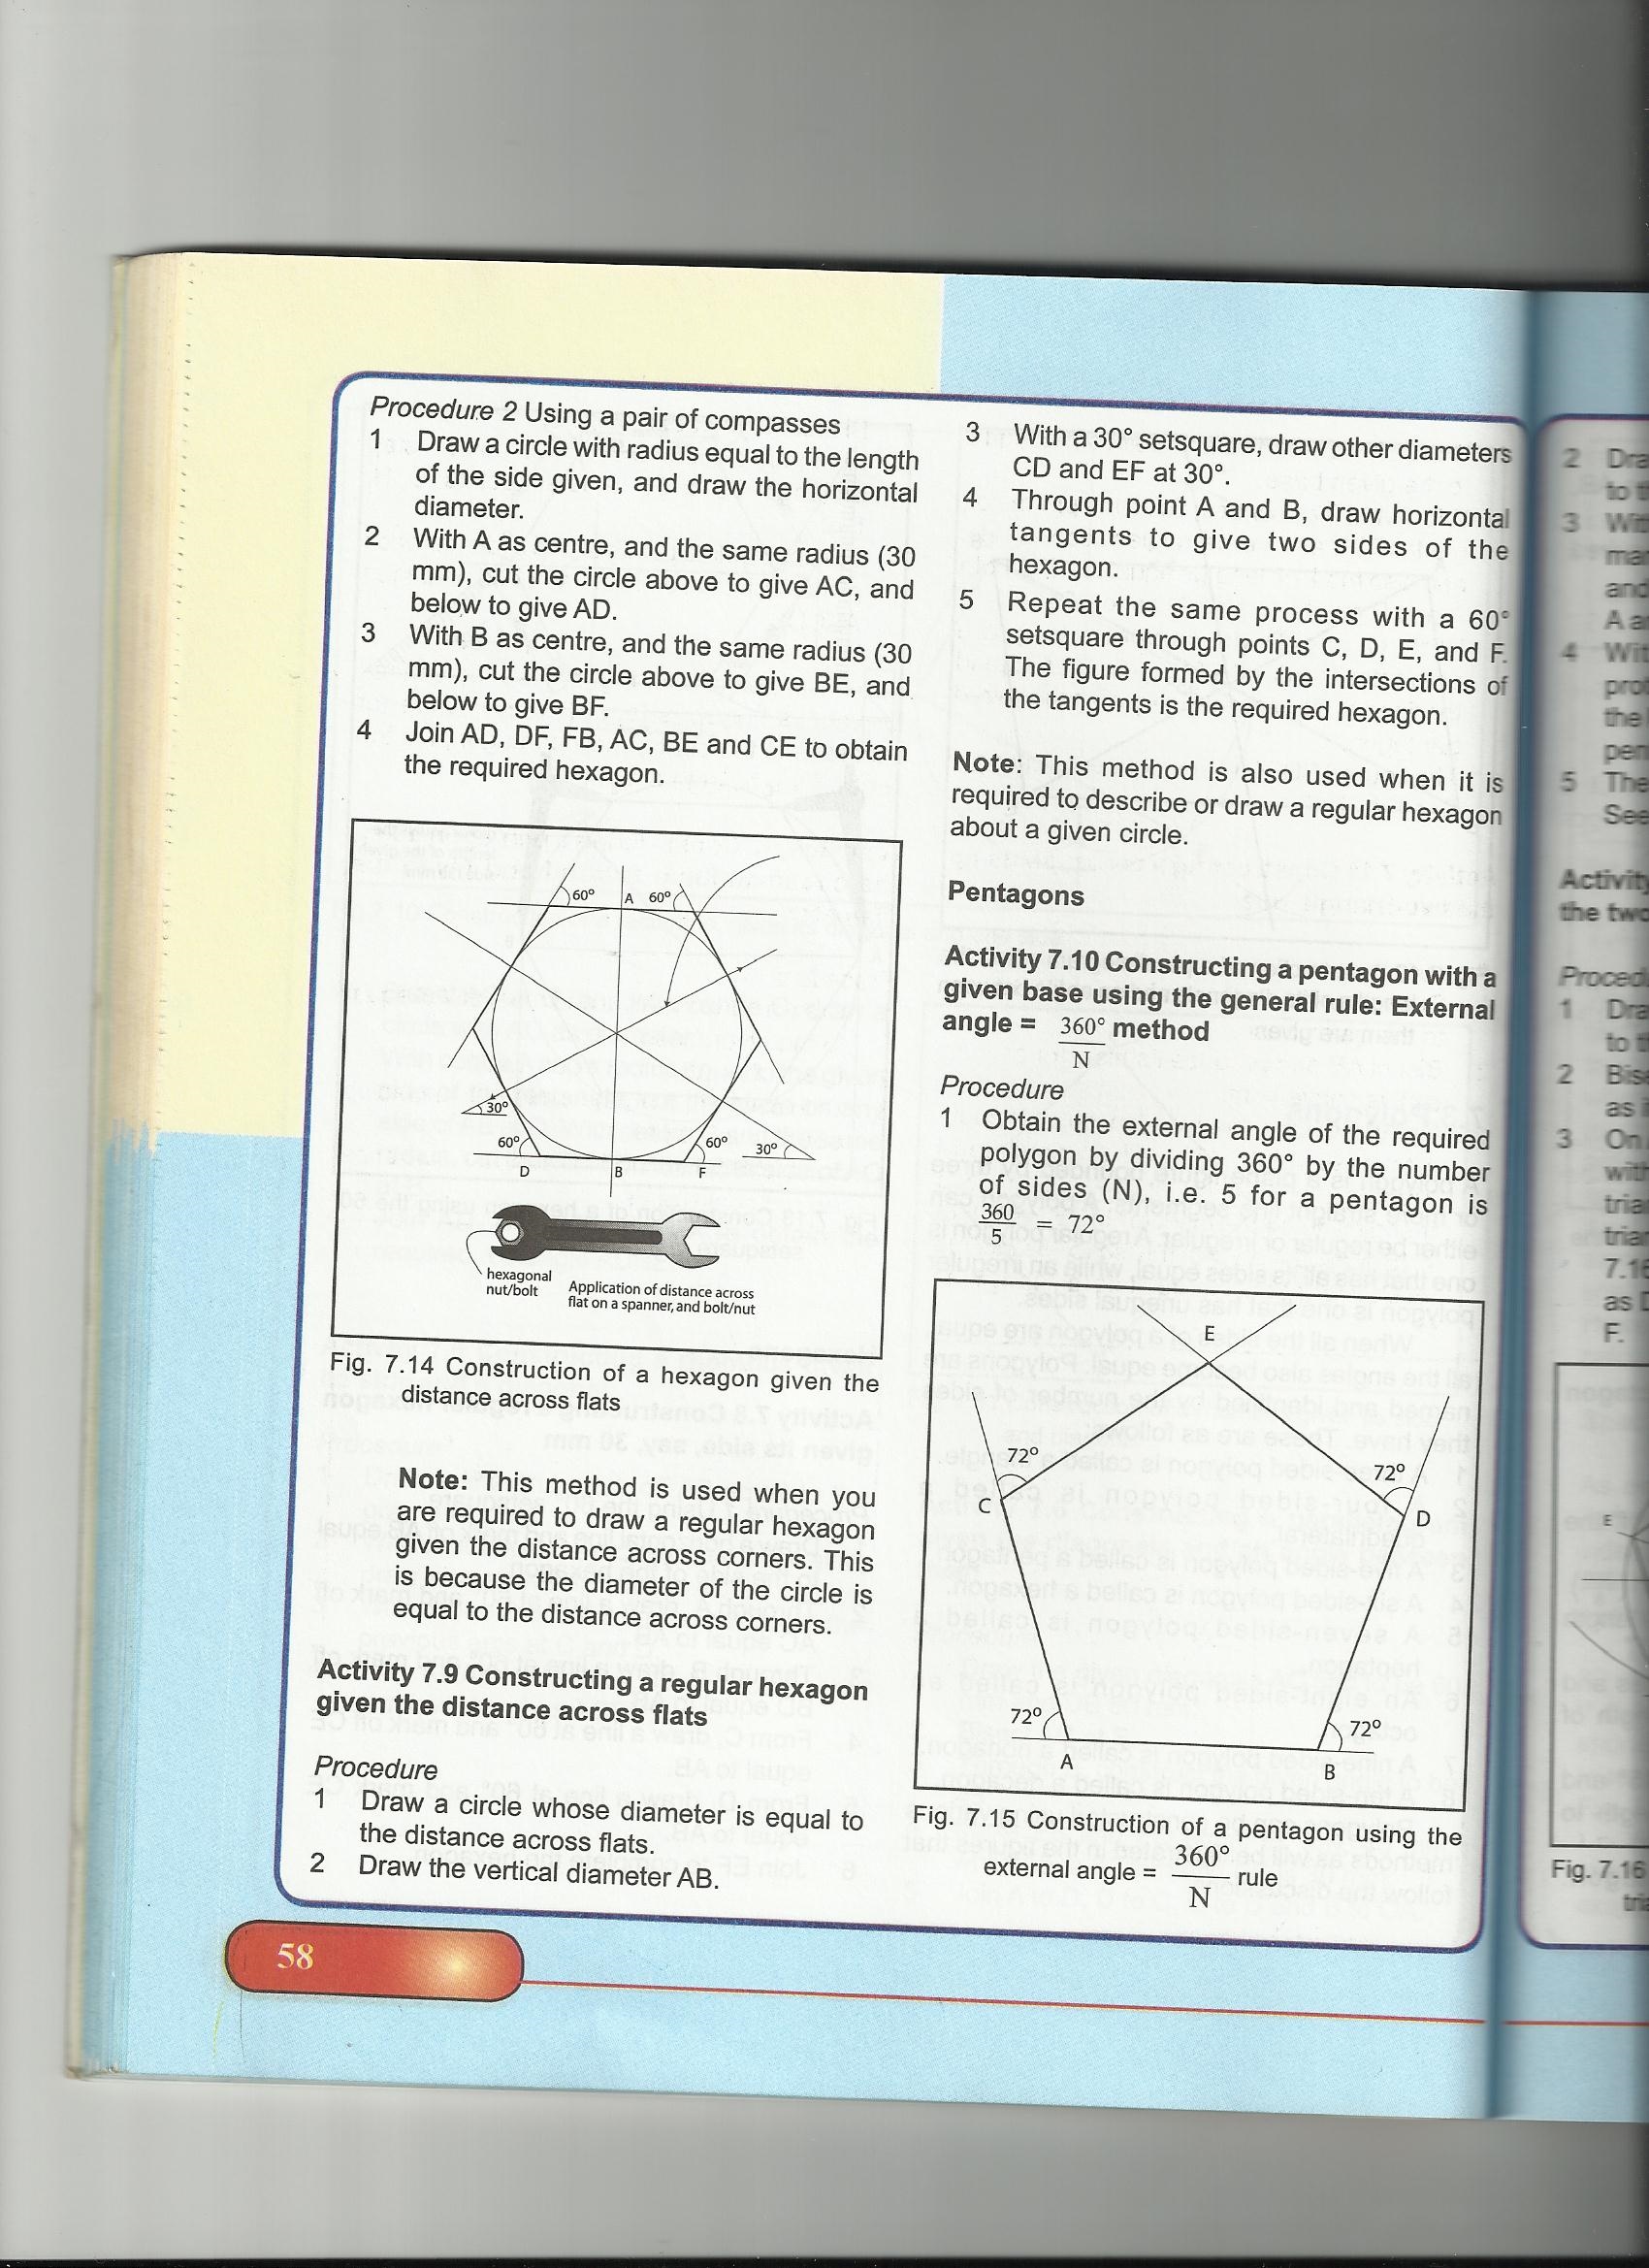
Construction of a triangle equal in area to a given quadrilateral
Procedure is as follow
1. Draw the given quadrilateral ABCD
2. Join AC
3. From D, construct line DE parallel to AC
4. Produce BC to meet DE at F
5. Join AF
6. ABF is the required triangle equal in area to ABCD. It can be proved from simple geometry that triangle ABF is equal in area to quadrilateral ABCD
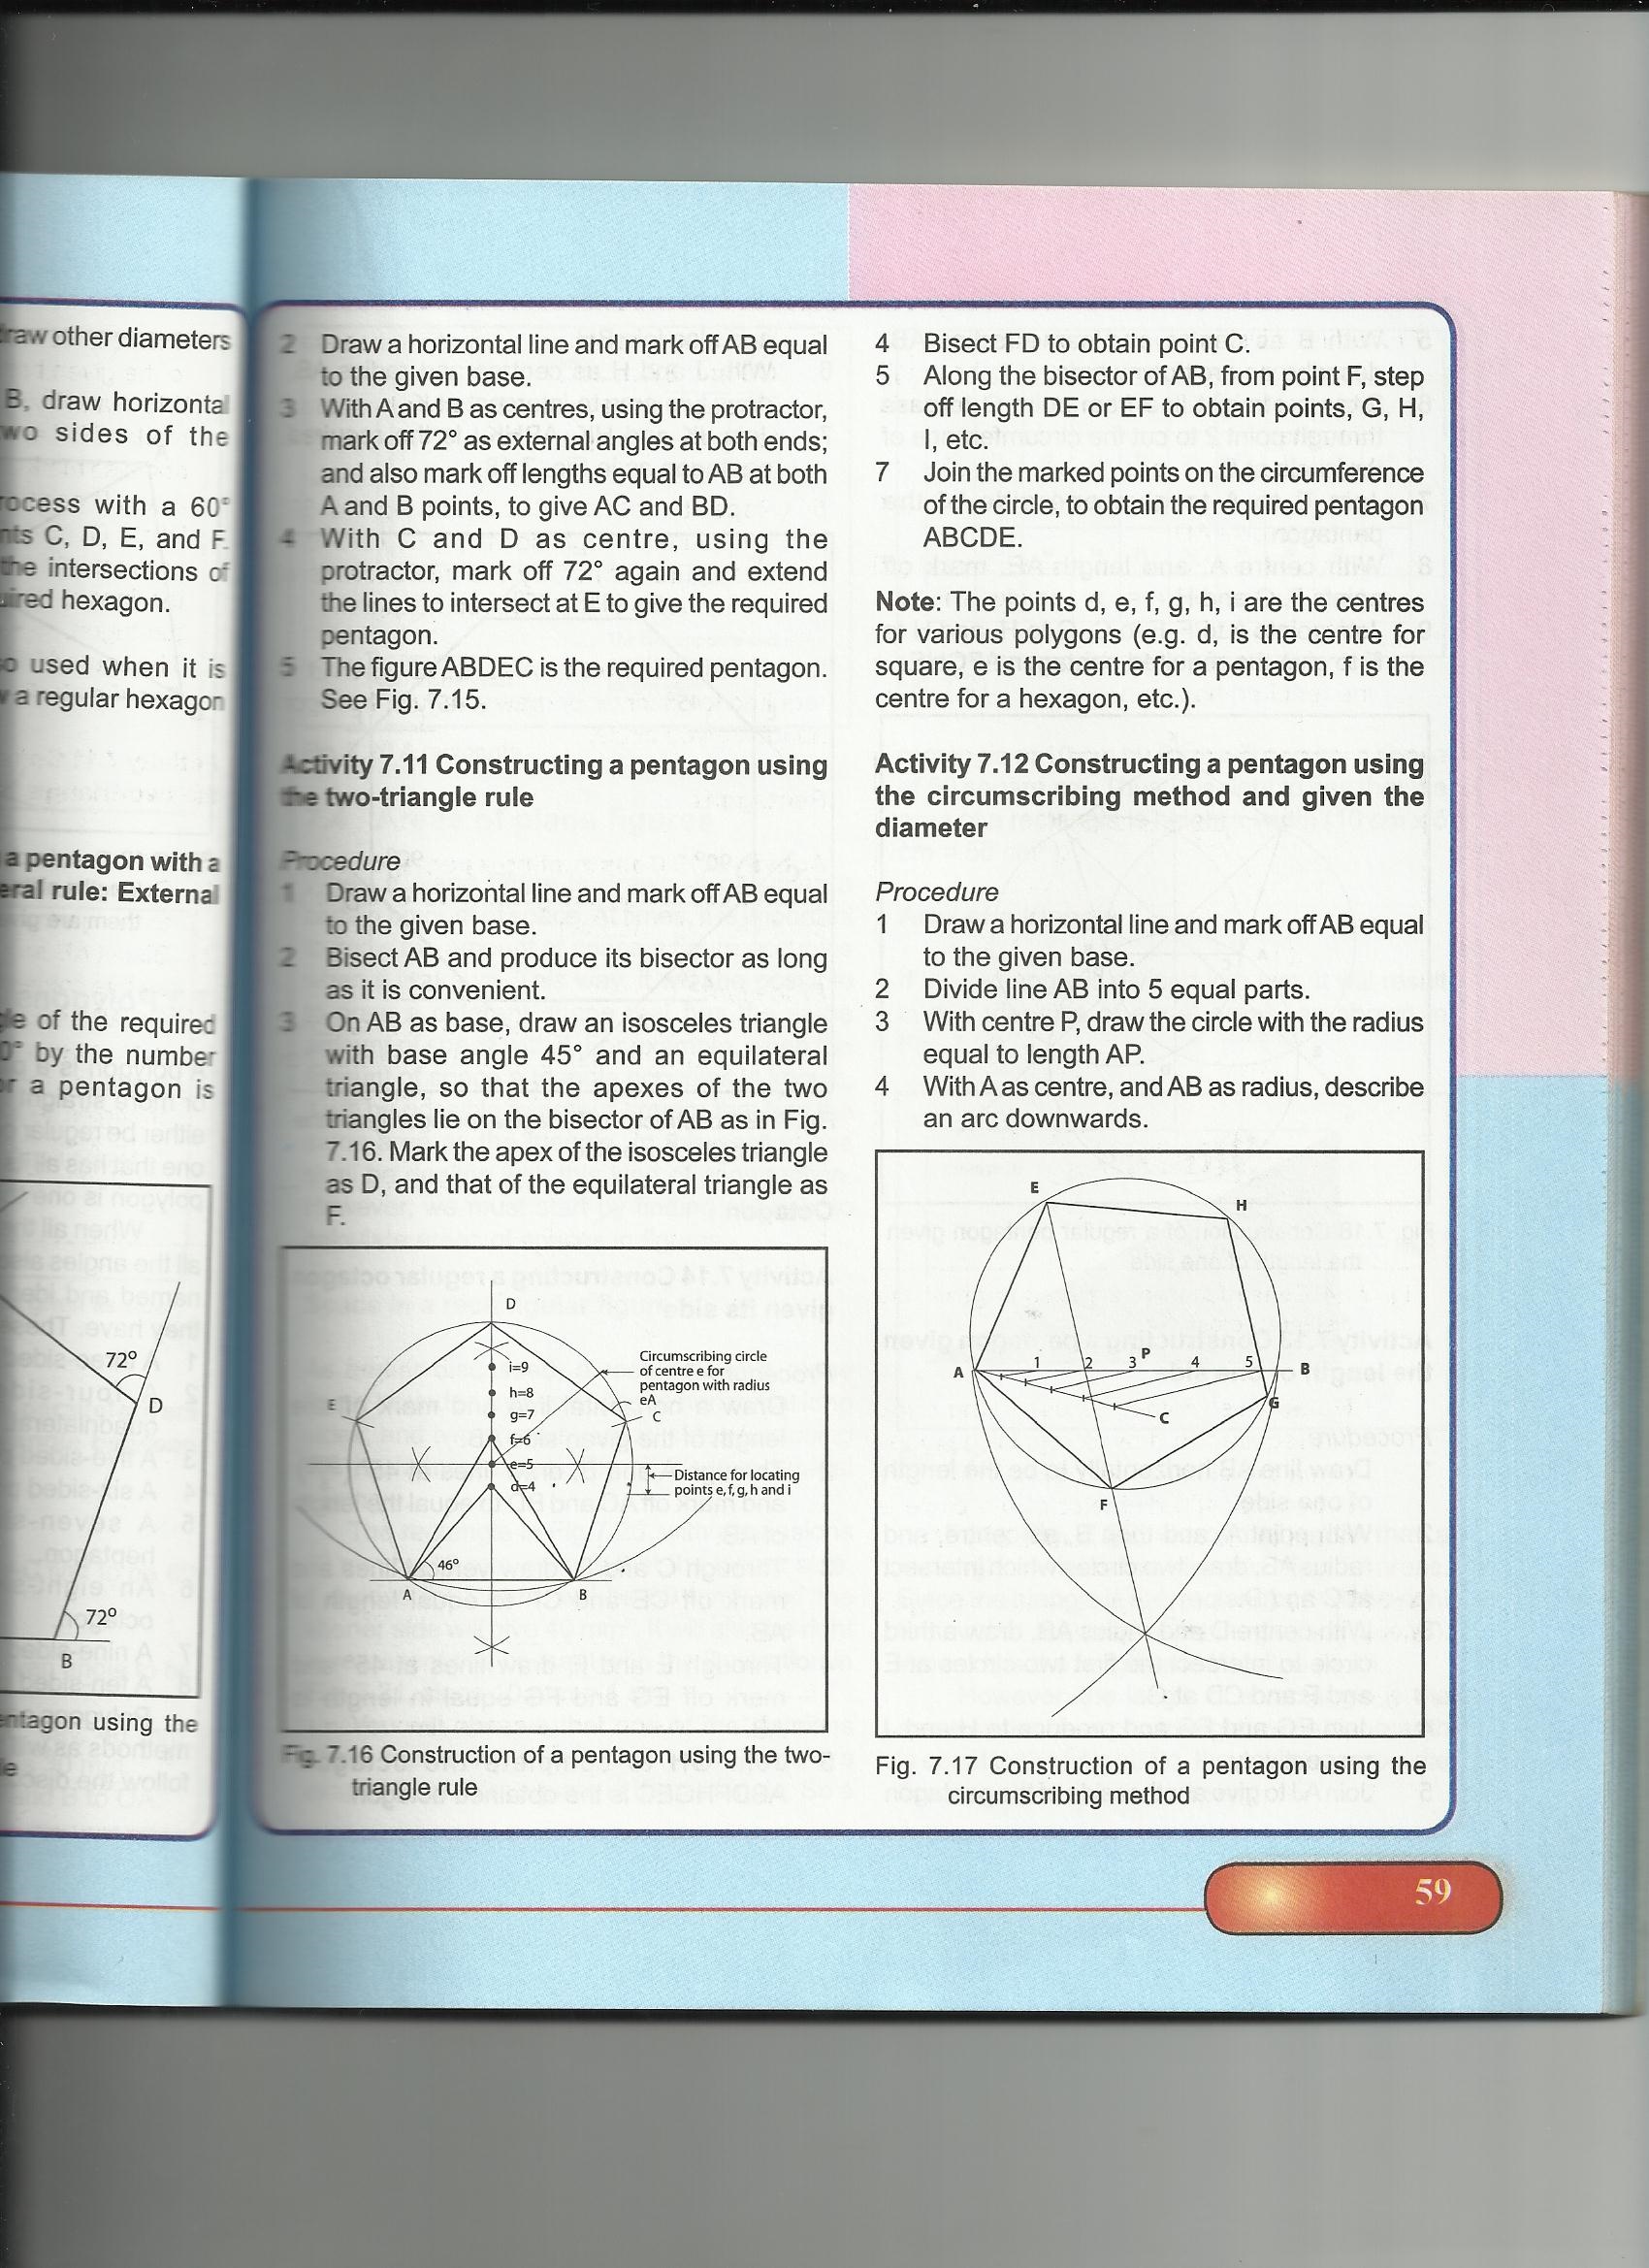
https://youtu.be/gJAsSM8RQaw
Construction of a rectangle equal in area to a given triangle
Procedure
1. Draw the given triangle ABC
2. Draw a line through A, parallel to BC
3. Bisect line BC perpendicularly at D and to meet the line through A at E
4. Draw a perpendicularly to BC at B to meet the line through A at F
5. FBDE is the rectangle required.
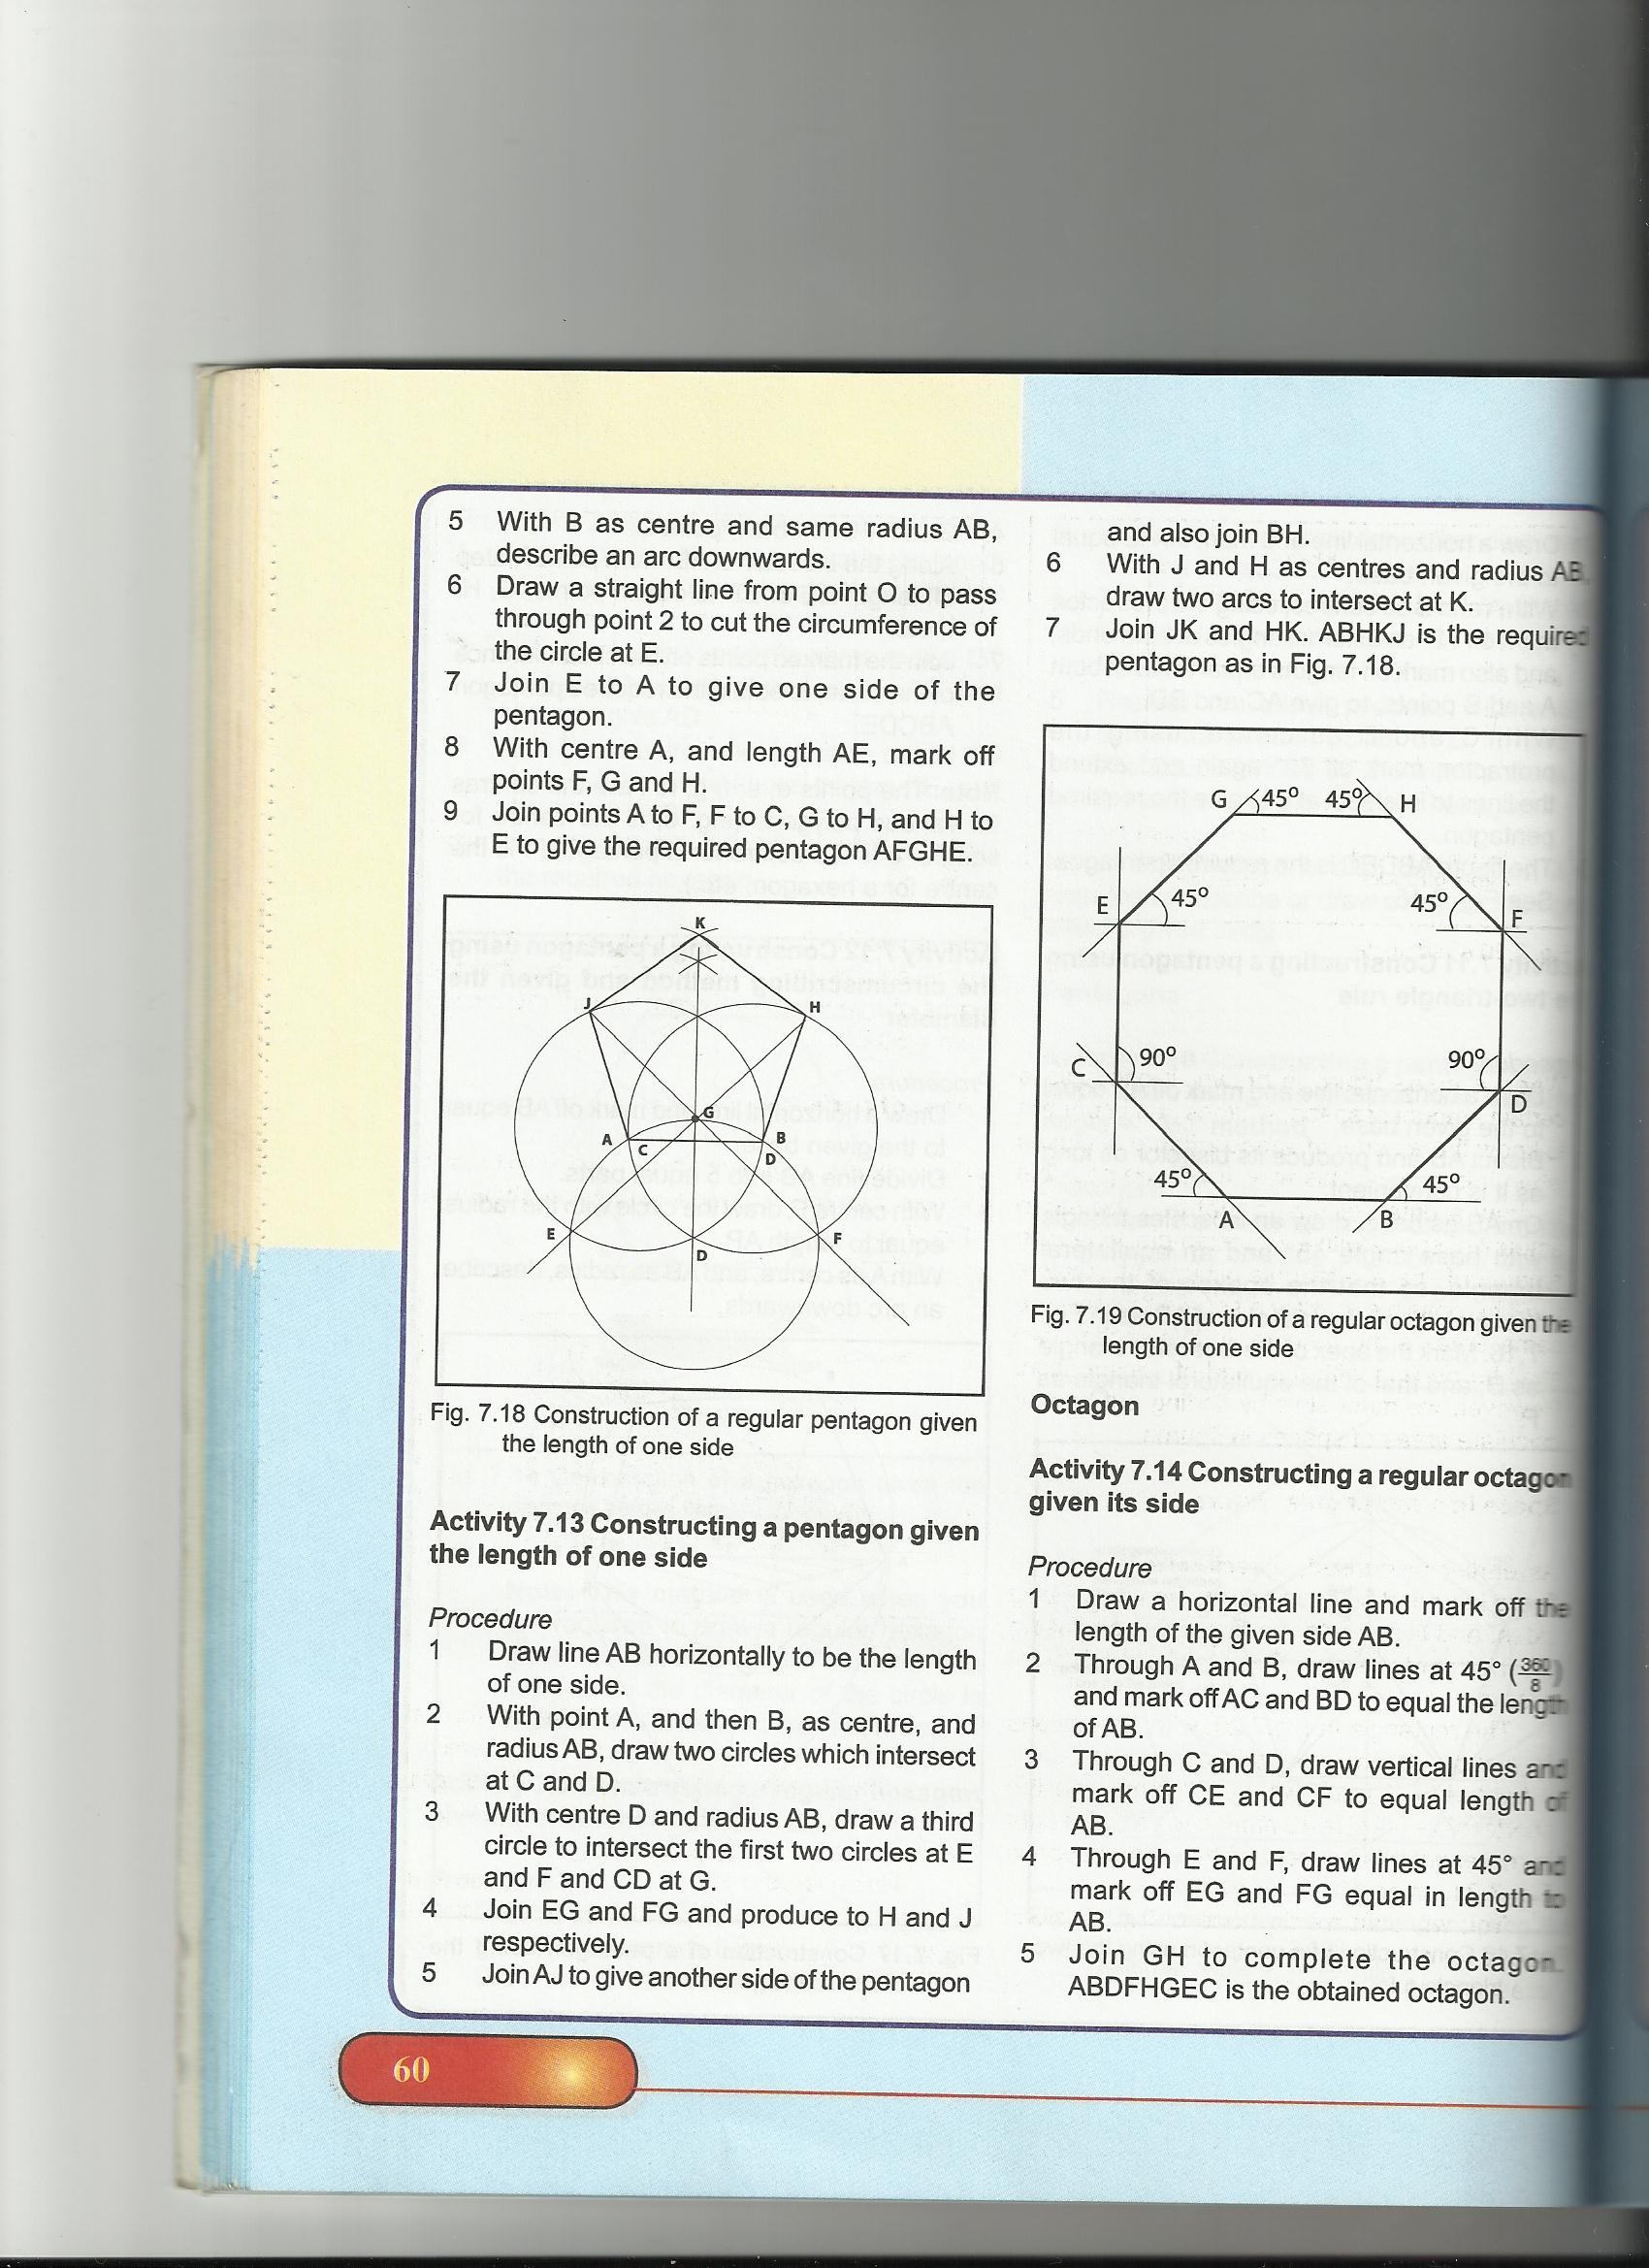
https://youtu.be/78ANuPQl1-0
5. METHOD OF LENGTH OF SIDE
1. Draw the rectangle ABCD
2. Produce AB and AD to E and F respectively such that the ratio AB: AE and AD: AF corresponds with the enlarged or reduced size.
3. Complete the enlarged or reduced rectangle AEGF or AE,G,F
EVALUATION
1. Using the radial method and method of length of side, enlarge a square of side 50mm to twice its original size
READING ASSIGNMENT: NERDC BASIC TECHNOLOGY FOR JSS2 Chapter 7 page 64 - 71
ASSIGNMENT
Use both radial and length of side methods to;
1. Enlarge and reduce a rectangle of 40mm by 20mm
2. State the major difference between radial method and length of side method.
Further Studies on Construction
TOPIC: PLANE FIGURES
SUB-TOPICS:
1. Construction of areas of regular plane figures
2. Construction of Plane figures of equal areas
Construction of areas of regular plane figures
The area of a plane figure is the space occupied by that figure. Area is usually the product of two lengths and its unit is given in cm2 or m2. The areas of plane figures (also known as polygons) can be obtained through the following methods:
a) Triangles: The area of a triangle is one-half the product of base and height.
b) Parallelogram: The area of a parallelogram is the product of one side and the perpendicular distance between that side and the opposite side.
c) Quadrilateral: A quadrilateral is the combination of two triangles. The areas of the two component triangles are found and added to give the area of the quadrilateral.
d) Square or Rectangle: The area of a square or a rectangle is defined as the product of length and breadth.
e) Trapezium: The area of a trapezium is one-half the product of the sum of parallel sides and the distance between them.
f) Regular polygon: The area of a regular polygon is found by joining the vertices of the polygon to the centre so as to form several triangles. The area of the regular polygon is equal to the area of one of the triangles multiplied by the number of sides.
https://youtu.be/Pz64J1hJV8E
Evaluation
Discuss the areas of four regular figures
LESSON 27
Construction of Plane figures of equal areas
A. Construction of a triangle equal in area to a rectangle
Procedure
1. draw the rectangle ABCD
2. project line CD and mark off DE, using the distant equal to CD
3. draw a horizontal line from point F to line BA parallel to BC
4. locate point G anywhere on line EF
5. join point G to B and C respectively, to obtain the triangle equal in area to rectangle ABCD. Triangle BCG is equal to the given rectangle
https://youtu.be/RPYRH4D_x6M
https://youtu.be/Yl8wM40Q2Mo
A triangle equal in area to a given rectangle
B. Construction of a Square equal in area to a Rectangle
Procedure
1. draw the rectangle ABCD
2. produce AD to E such that DE equals CD
3. construct a semi-circle with AE as diameter
4. produce CD to meet the semi-circle at F
5. Construct square DFGH starting with DF. Square DFGH is the required square which is equal in area to rectangle ABCD
https://youtu.be/DJYKbsnBwno
C. Construction of a triangle equal in area to a given quadrilateral
Procedure is as follow
1. Draw the given quadrilateral ABCD
2. Join AC
3. From D, construct line DE parallel to AC
4. Produce BC to meet DE at F
5. Join AF
6. ABF is the required triangle equal in area to ABCD. It can be proved from simple geometry that triangle ABF is equal in area to quadrilateral ABCD
https://youtu.be/RPYRH4D_x6M
D. Construction of a rectangle equal in area to a given triangle
Procedure
1. Draw the given triangle ABC
2. Draw a line through A, parallel to BC
3. Bisect line BC perpendicularly at D and to meet the line through A at E
4. Draw a perpendicularly to BC at B to meet the line through A at F
5. FBDE is the rectangle required.
A rectangle equal in area to a given triangle
https://youtu.be/78ANuPQl1-0
Evaluation
1. Draw a triangle equal in area to a square with 5cm sides
2. Draw a rectangle 7cm long and 4 cm wide. Construct a square equal in area to the rectangle
3. A square has a side 45mm long. Construct a rectangle equal in area to the square and one of whose sides is 60 mm in length.
Reading Assignment:
NERDC Basic Technology for Junior Secondary Schools 2 chapter 7 page 61- 67
Assignment
1. Draw a rectangle 7cm long and 4cm wide. Construct a square equal in area to the rectangle.
2. Draw a triangle with sides 7cm, 5cm and 8cm. construct a square equal in area to the triangle
3. Draw a rectangle 8cm long 5cm wide. Construct another rectangle whose area is four times that of the given rectangle.
4. Draw two lines AB and BC to intersect at an angle 480. Without using a protractor, transfer the angle to another point.
5. Construct a parallelogram of equal area to a rectangle 8 cm long and 6cm wide.
LESSON 28
TOPIC: ENLARGEMENT AND REDUCTION OF PLANE FIGURES
SUB-TOPICS:
1. Enlargement/Reduction of plane figures
2. The Radial Method and Method of Length of Side
Enlargement/Reduction of plane figures
An object is enlarged when all of its dimensions are changed in the same ratio. Thus, enlargement is also called transformation. Each length of the objects is multiplied by the same number called scale factor to obtain the enlargement.
When the scale factor is less than one, the original objects is reduced.
I.e. Scale Factor = length of enlargement/corresponding length.
Examples of enlargement/reduction of plane shapes include:
ENLARGEMENT
i) Drawing a triangle which is twice the size of the original triangle
Procedure;
1. Draw the given triangle ABC
2. Draw DB perpendicularly to AB, such that BD=AB
3. With center A, and radius AD, draw an arc to meet AB at E
4. From E, draw EF parallel to BC, with F on line AC
5. Draw lines to join AEF to give the triangle double in size
https://youtu.be/PuHE6a3V7Dw
ii) Drawing a square which is twice the size of the original square
Procedure;
1. Draw the given square ABCD
2. Draw one of the diagonals, AC.
3. With A as center, and radius AC, draw an arc to meet AD at E.
4. AE is one side of the square.
5. With radius AE, and center A, mark G on line BA produced
6. With the same radius, and center E, mark F. join G and F with a tangent to complete the square.
REDUCTION
Reducing a Plane Figure to half its area
Procedure
1. Draw the given square ABCD
2. Draw the diagonal AC and BD to intersect at O.
3. With center C and radius CO, draw an arc which meets CD at E. CE is the length of one side
4. With radius CE and center E, strike an arc above CD at F.
5. With radius CE and center C, strike another arc above line CD and G.
6. Join EF, FG and GC to obtain the square CEFG half the size of the original.
Evaluation
1. Define enlargement of a plane figure
2. What is a scale factor
3. Draw a triangle and a square of your choice which are four times the size of the original triangle and square
4. Reduce a square of your choice to one-quarter of its original size
LESSON 29
The Radial Method and Method of Length of Side
Enlargement and reduction of plane shapes can be done in two ways;
1. The radial method
2. The length of side
1. THE RADIAL METHOD
Procedure
1. Draw the rectangle ABCD
2. Join AC and produce it to E
3. Mark a point F and AE such that the ratio AC: AF is the correct ratio of the enlargement or reduction.
4. Complete the rectangle AGFH.
Construction of a triangle equal in area to a given quadrilateral
Procedure is as follow
1. Draw the given quadrilateral ABCD
2. Join AC
3. From D, construct line DE parallel to AC
4. Produce BC to meet DE at F
5. Join AF
6. ABF is the required triangle equal in area to ABCD. It can be proved from simple geometry that triangle ABF is equal in area to quadrilateral ABCD
https://youtu.be/gJAsSM8RQaw
Construction of a rectangle equal in area to a given triangle
Procedure
1. Draw the given triangle ABC
2. Draw a line through A, parallel to BC
3. Bisect line BC perpendicularly at D and to meet the line through A at E
4. Draw a perpendicularly to BC at B to meet the line through A at F
5. FBDE is the rectangle required.
https://youtu.be/78ANuPQl1-0
5. METHOD OF LENGTH OF SIDE
1. Draw the rectangle ABCD
2. Produce AB and AD to E and F respectively such that the ratio AB: AE and AD: AF corresponds with the enlarged or reduced size.
3. Complete the enlarged or reduced rectangle AEGF or AE,G,F
EVALUATION
1. Using the radial method and method of length of side, enlarge a square of side 50mm to twice its original size
READING ASSIGNMENT: NERDC BASIC TECHNOLOGY FOR JSS2 Chapter 7 page 64 - 71
ASSIGNMENT
Use both radial and length of side methods to;
1. Enlarge and reduce a rectangle of 40mm by 20mm
2. State the major difference between radial method and length of side method.
Further Studies on Construction
WEEK 9
LESSON 29
SPECIFIC TOPIC : Locating the center of a circle
REFERENCE BK : Basic technology for JSS by Evans and Nation Building Basic Technology by E.K AJAYI.
PERFORMANCE OBJECTIVES: At the end of the lesson the students should be able to draw a circle and locate the center.
CONTENT
https://drive.google.com/file/d/1fr3GVI ... sp=sharing
Procedures for locating the centre of a circle
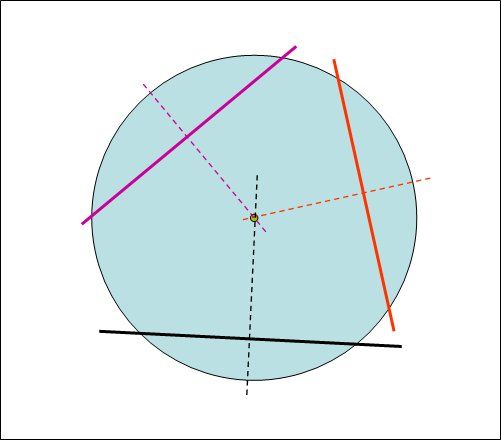
STEP .1 Draw a circle with a circular shape
STEP.2 draw any two cords
STEP.3 bisect the two cords
STEP.4 the intersection of the two bisectors is the centre of the circle
EVALUATION/CLASSWORK
Draw a circle and locate the centre
further studies
http://planetmath.org/compassandstraigh ... ivencircle
http://www.mathopenref.com/constcirclecenter.html
http://www.mathopenref.com/constcirclecenter2.html
LESSON 30
MAIN TOPIC : miscellaneous construction
SPECIFIC TOPIC : Line problems
REFERENCE BK : Basic technology for JSS by Evans and Nation Building Basic Technology by E.K AJAYI.
PERFORMANCE OBJECTIVES: At the end of the lesson the students should be able to draw lines and link them
CONTENT
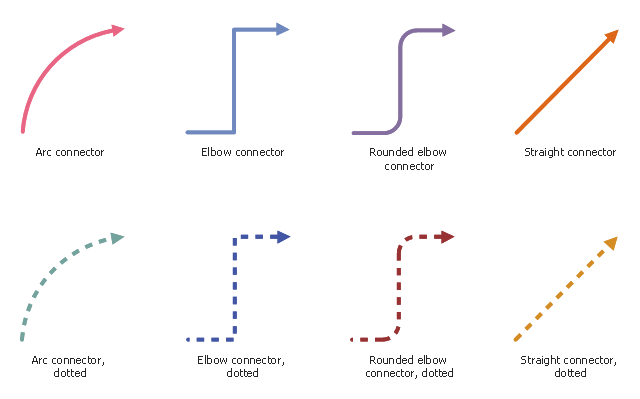
https://drive.google.com/file/d/1fr3GVI ... sp=sharing
EVALUATION/CLASSWORK
Draw a right angle ABC of AB= 50mm and BC= 40mm and link them with an arc of 15mm
further practice
http://www.mathscore.com/math/practice/Line%20Segments/
SPECIFIC TOPIC : Locating the center of a circle
REFERENCE BK : Basic technology for JSS by Evans and Nation Building Basic Technology by E.K AJAYI.
PERFORMANCE OBJECTIVES: At the end of the lesson the students should be able to draw a circle and locate the center.
CONTENT
https://drive.google.com/file/d/1fr3GVI ... sp=sharing
Procedures for locating the centre of a circle
STEP .1 Draw a circle with a circular shape
STEP.2 draw any two cords
STEP.3 bisect the two cords
STEP.4 the intersection of the two bisectors is the centre of the circle
EVALUATION/CLASSWORK
Draw a circle and locate the centre
further studies
http://planetmath.org/compassandstraigh ... ivencircle
http://www.mathopenref.com/constcirclecenter.html
http://www.mathopenref.com/constcirclecenter2.html
LESSON 30
MAIN TOPIC : miscellaneous construction
SPECIFIC TOPIC : Line problems
REFERENCE BK : Basic technology for JSS by Evans and Nation Building Basic Technology by E.K AJAYI.
PERFORMANCE OBJECTIVES: At the end of the lesson the students should be able to draw lines and link them
CONTENT
https://drive.google.com/file/d/1fr3GVI ... sp=sharing
EVALUATION/CLASSWORK
Draw a right angle ABC of AB= 50mm and BC= 40mm and link them with an arc of 15mm
further practice
http://www.mathscore.com/math/practice/Line%20Segments/